Determination of Surface Water Repellency of Textiles—Spray Test

Surface water repellency (water beading rating) is one of the most intuitive and commonly used indicators for measuring a fabric’s water-repellent performance. Whether for outdoor jackets, medical protective clothing, or everyday casual fabrics, water-repellent performance resembling the “lotus effect” relies on precise spray test evaluations.


I. What Is a Spray Test?


The spray test is a rapid testing method that simulates a rain shower to evaluate a fabric’s surface resistance to liquid water. The core principle involves spraying water onto the fabric surface in a specific manner and determining the fabric’s water-repellency rating by observing the degree of wetting.


It is important to note that the spray test measures surface water repellency, not the fabric’s water absorption rate or resistance to rain penetration. In other words, even if a fabric achieves the highest rating in the spray test, it does not necessarily mean it can prevent rainwater from penetrating under pressure—this is the question addressed by the hydrostatic pressure test (GB/T 4744).


II. Compliance with Standards


GB/T 4745, “Textiles—Testing and Evaluation of Water Repellency—Spray Method,” is equivalent to the international standard ISO 4920. This standard applies to all types of fabrics, whether or not they have undergone water-repellent or water-resistant finishing.


ISO 4920:2012, published by the International Organization for Standardization, is titled “Textiles—Determination of resistance to surface wetting (spray test)” and is highly consistent with GB/T 4745 in terms of technical content; it is a standard frequently cited in export trade and international certification.


AATCC 22 is the spray test standard established by the American Association of Textile Chemists and Colorists (AATCC). Its rating system uses a 0–100 point scale, which corresponds to the 1–5 grade system of GB/ISO (for example, Grade 5 under the national standard corresponds to 100 points on the AATCC scale).


III. Test Principle


During the test, mount the specimen on a ring-shaped clamp so that the fabric’s right side faces upward and is positioned at a 45° angle to the horizontal plane. The center of the specimen should be directly below the nozzle, 150 mm away. Next, pour distilled or deionized water quickly and steadily into the glass funnel; the water is sprayed evenly onto the specimen’s surface through the nozzle. The entire spraying process lasts approximately 25–30 seconds.


IV. Rating Criteria


After the spraying is complete, the operator must quickly remove the clamp along with the specimen, positioning the fabric’s right side so that it is nearly horizontal. The operator then gently taps the specimen once at each of two points radially opposite on the frame. Finally, the specimen is rated based on its degree of wetting by comparing it to the standard images.

GB/T 4745 classifies water wetting levels into grades 1 through 5:


Grade 5: The sprayed surface is completely unwet, with no water droplets adhering to it—this represents the ideal “lotus effect.”

Grade 4: The sprayed surface is unwet, but small water droplets adhere to it—the droplets remain on the surface without spreading.

Grade 3: The surface shows only small, unconnected areas of wetting—scattered wetting spots appear.

Grade 2: Half of the surface is wetted—typically manifested as the sum of small, unconnected wetted areas.

Level 1: The entire surface is wetted—the water has spread completely and penetrated the fabric surface.

For dark-colored fabrics, due to insufficient contrast in the standard images, grading is based primarily on the textual description rather than the images. At least three samples must be taken for each test, cut from different areas of the fabric. Avoid creases and folds, and minimize handling after sampling to prevent oils from the hands from affecting the fabric’s wetting properties.


V. Industry Value of the Water Beading Test


Due to its simplicity, intuitive results, and low cost, the water beading test has become an indispensable tool for quality control and product development in the textile industry. For fabrics treated with fluorocarbon compounds, silicones, or other water-repellent finishes, the water beading grade serves as the quickest indicator for evaluating the effectiveness of the finish. At the same time, it is the performance parameter that consumers find easiest to understand—a fabric with a water beading rating of Level 5 means that rainwater will roll off it just as it does on a lotus leaf, without immediately wetting the garment.

Accurate water beading tests not only help companies control product quality but also provide consumers with reliable performance guarantees.
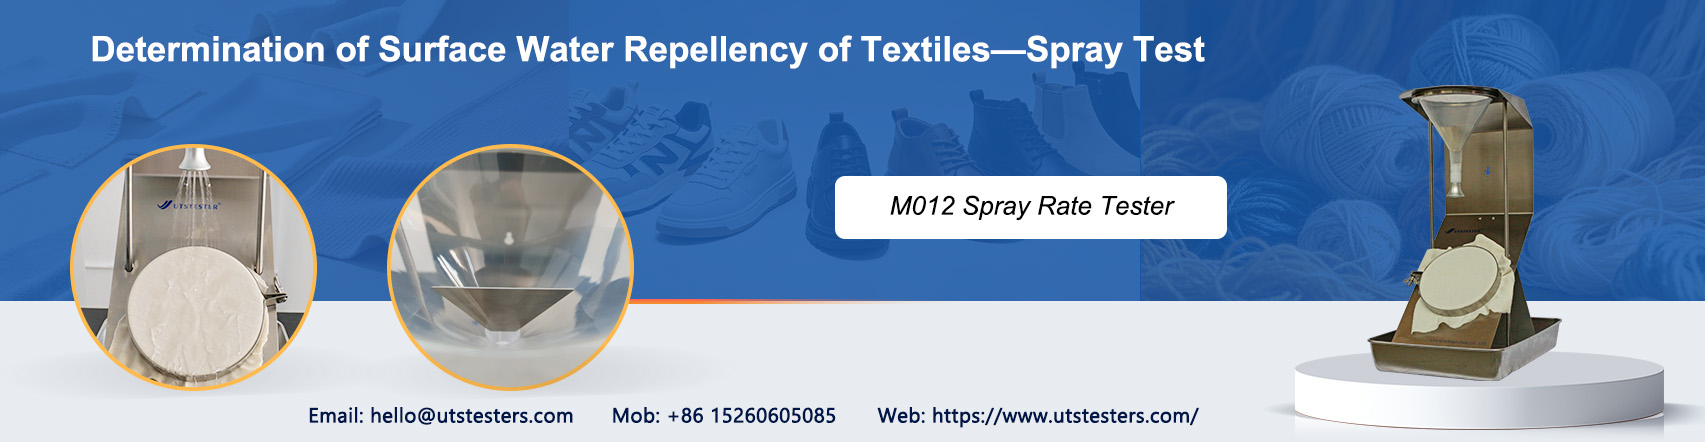
Spray Rating Tester M012


Email: hello@utstesters.com

Direct: + 86 152 6060 5085

Tel: +86-596-7686689

Web: www.utstesters.com
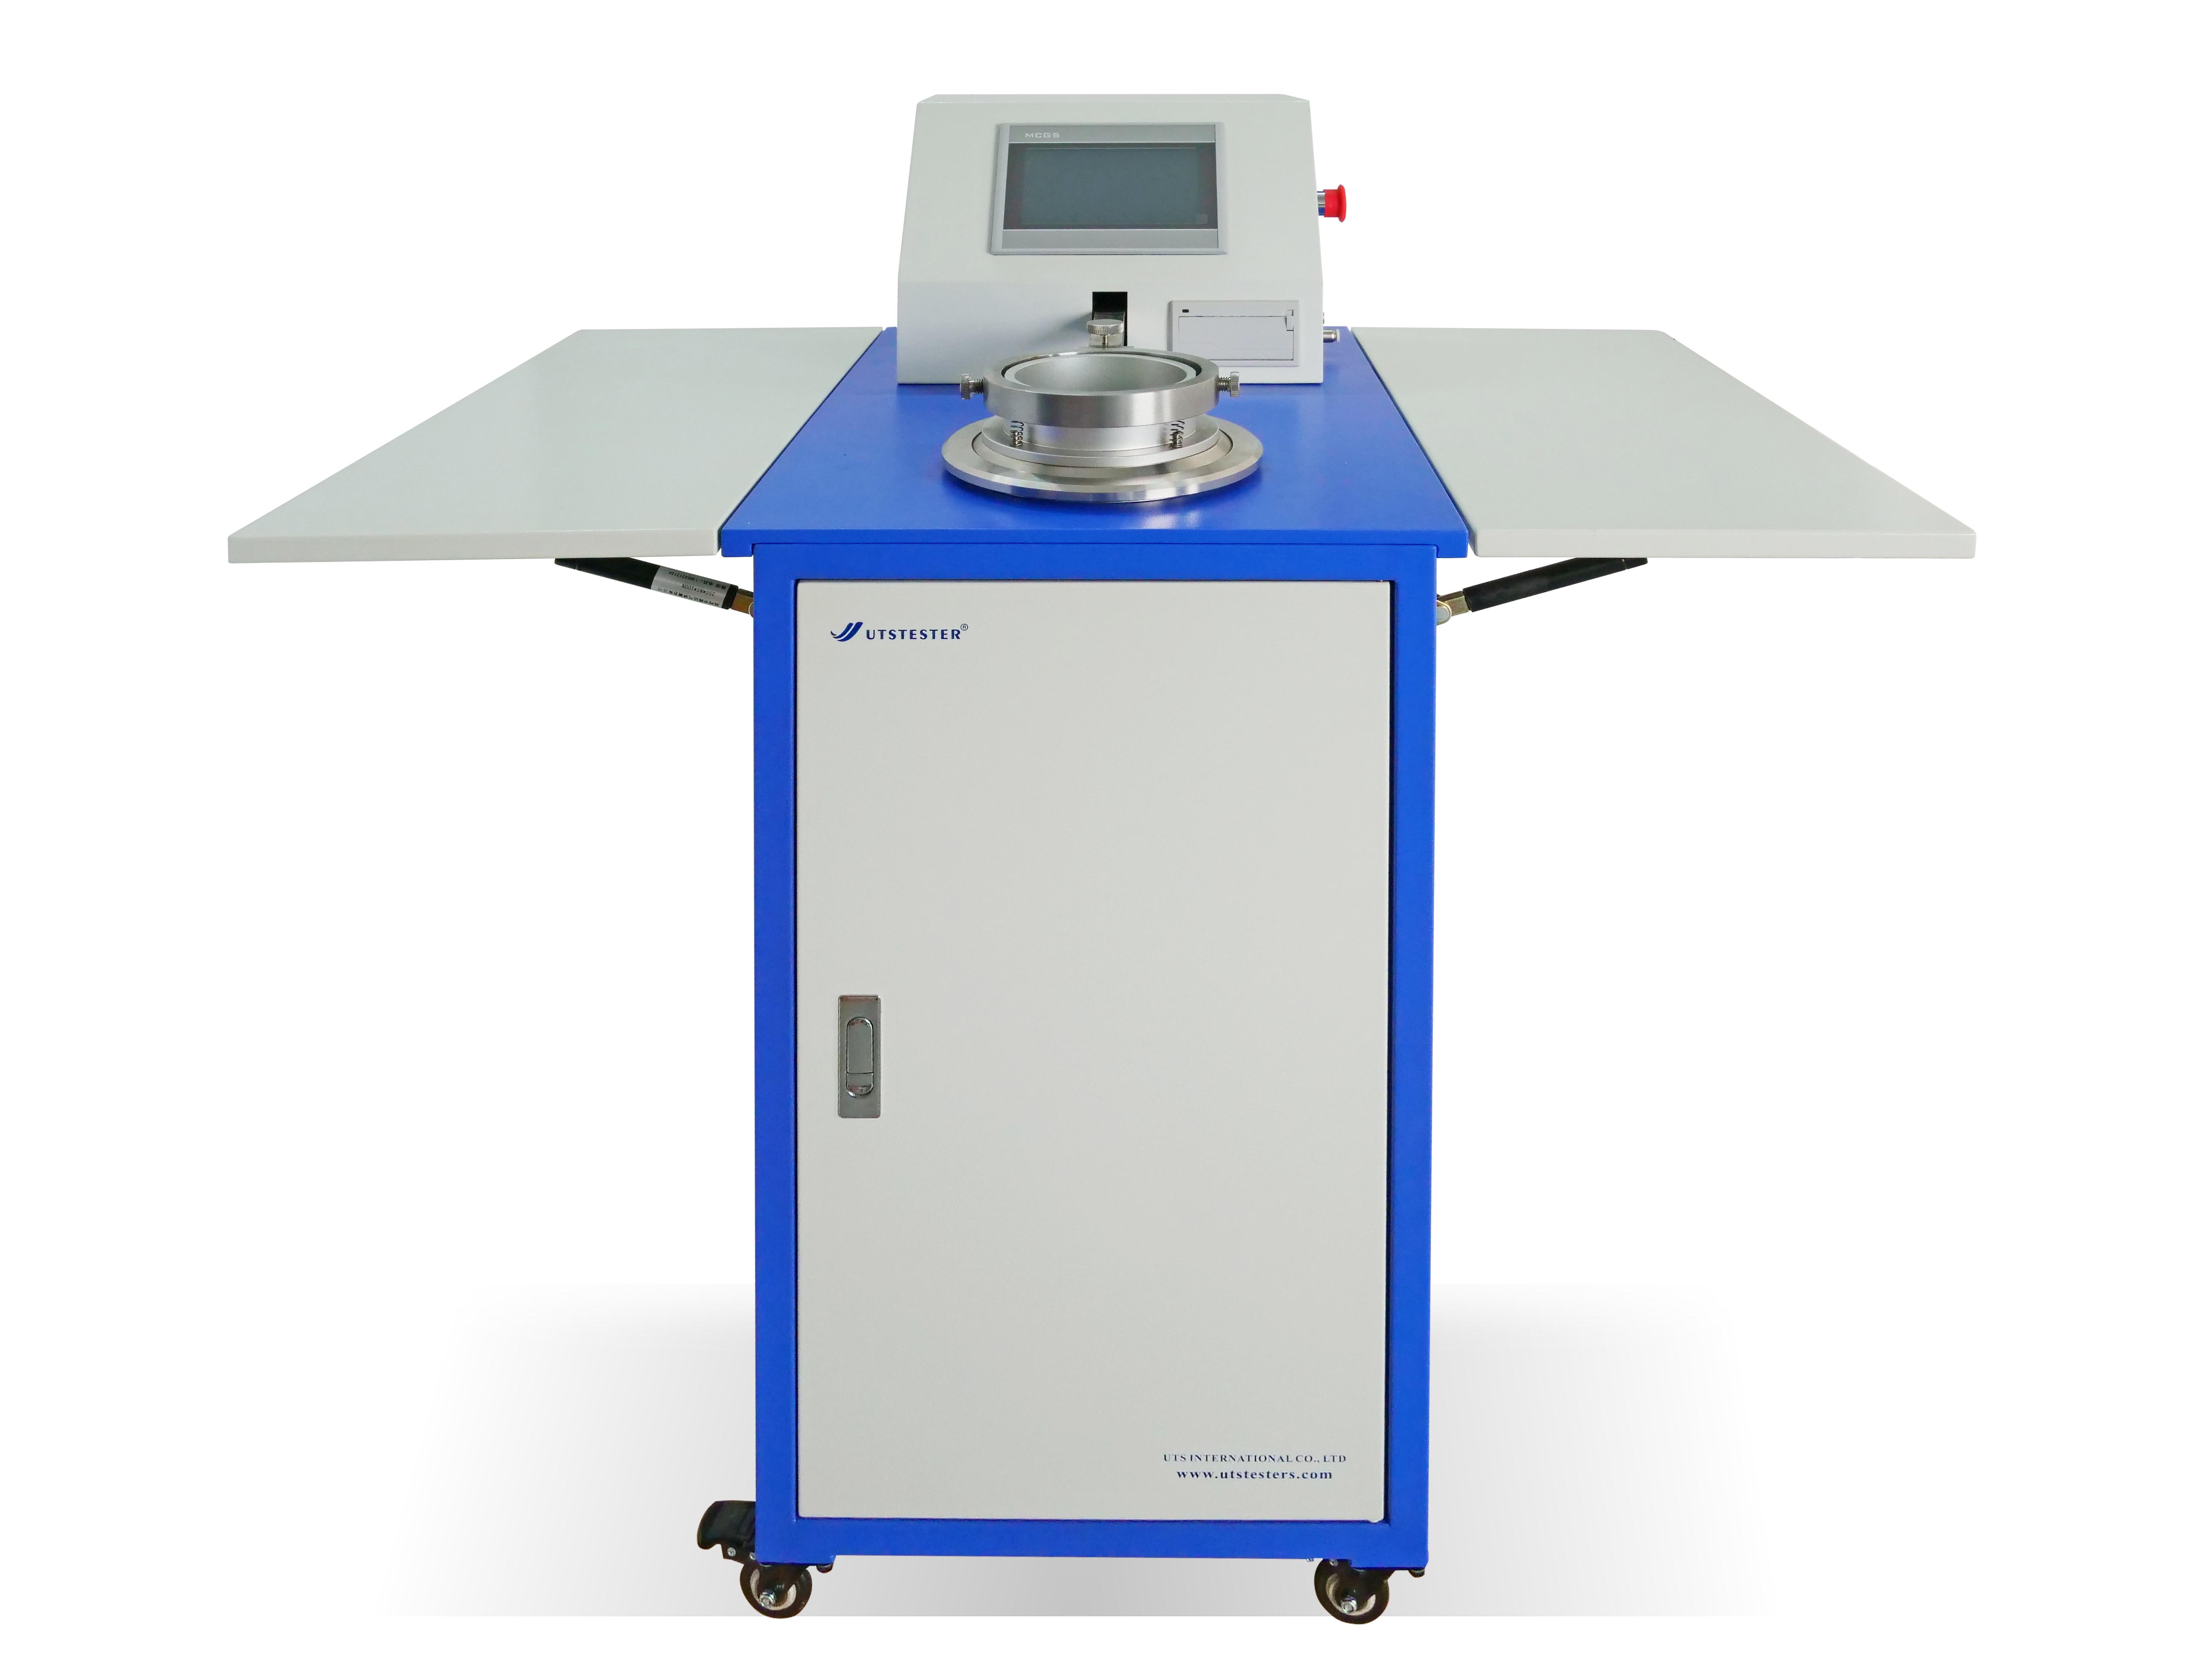

Fabric air permeability tester

The significance of fabric air permeability test


Air permeability is a physical index that characterizes the air permeability in the tested sample, mainly for porous materials with large air permeability, such as textiles, sponges, leather, etc. For fabric materials, the air permeability is related to the number and size of the gaps between the warp and weft yarns and the gaps between the fibers, the warp and weft density, the yarn twist, the fiber properties, the yarn structure, the fabric thickness and other factors.Different requirements for fabrics have different air permeability according to their specific uses. For example, the air permeability of fabrics used to make parachutes should be strictly controlled within the specified range. If the air permeability is too large, the parachute cannot be fully inflated. If the air permeability is too small, the stability of the parachute is poor or even damaged. Fabrics used as carpets are required to have relatively high air permeability. Even if they are all fabrics for making clothes, their air permeability should also vary to ensure that the clothes are comfortable to wear. For example, summer clothes should have a large air permeability and good heat dissipation, while winter coats should have a small air permeability to improve the warmth retention effect. Therefore, appropriate air permeability is one of the prerequisites for fabrics to have good performance.


Test principle of fabric air permeability test


According to the specified method and parameters, clamp the sample at the air inlet of the fabric air permeability tester, and then adjust the fan speed to achieve a pressure difference on both sides of the fabric. The air permeability of the breathable fabric is determined based on the nozzle aperture and the size of the pressure difference on both sides. The air permeability refers to: the gas flow rate per unit area of the fabric vertically per unit time under the specified p.

Next, set a specified pressure difference on the tester, which is usually adjusted according to the test standard and fabric characteristics.

Then start the tester and measure the air flow through the fabric under the set pressure difference. The test results are expressed in volume flow units, such as cm's or L/min.

Finally, the tester automatically records the measured data and calculates the air permeability index of the fabric. According to different test standards, air permeability can be expressed as air flow or air permeability.

To ensure the accuracy and comparability of test results, various countries and regions have established multiple air permeability test standards. Common standards include the ASTM D737 standard of the American Society for Testing and Materials, the IS0 9237 standard of the International Organization for Standardization, and the Chinese national standard GBTT5453. These standards have detailed provisions for sample preparation, test conditions, data processing, etc. to ensure the scientificity and consistency of test results.


As a precision testing equipment, the automatic air permeability tester plays a vital role in testing the air permeability of textiles. Through scientific and rigorous testing methods, it can accurately evaluate the air permeability of fabrics and ensure product quality and effect. If you want to know more about this machine, please feel free to consult UTSTESTER.


Email: hello@utstesters.com

Direct: + 86 152 6060 5085

Tel: +86-596-7686689

Web: www.utstesters.com
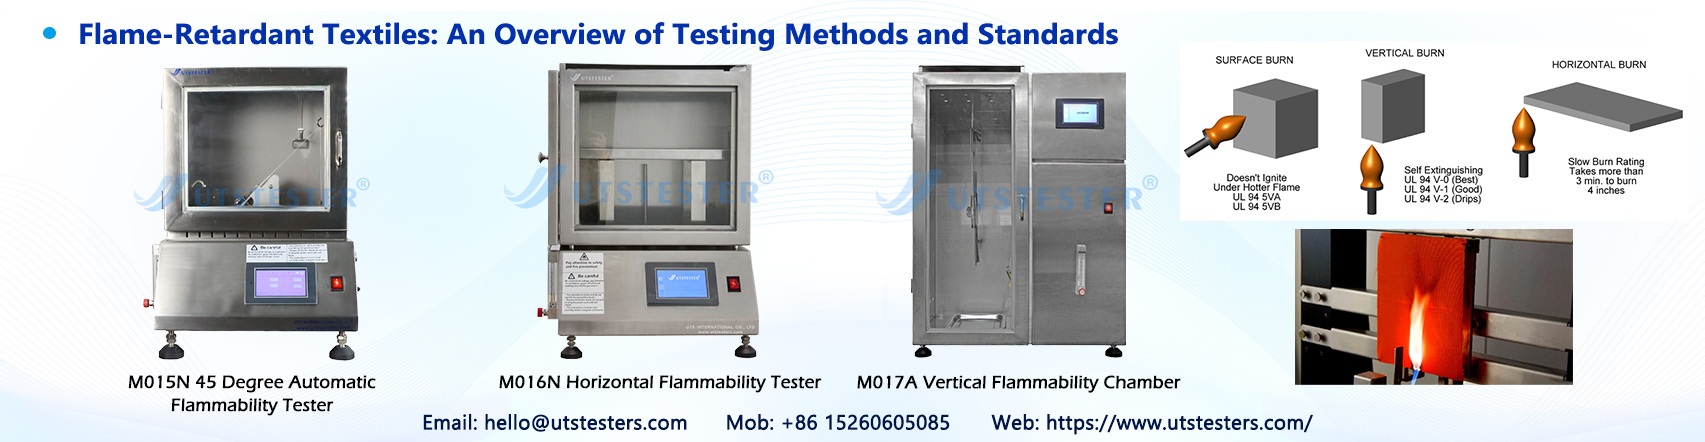

Flame-Retardant Textiles An Overview of Testing Methods and Standards

In the textile industry, flame-retardant textiles are being used in an increasingly wide range of applications—from industrial protective workwear and decorative fabrics in public spaces to infant and children’s clothing and vehicle interiors. Their flame-retardant properties directly impact personal safety and environmental safety. This article outlines the testing methods, core standards, and key considerations during the testing process for flame-retardant textiles, providing a reference for industry professionals.


I. Testing Methods for Flame-Retardant Textiles


The core of testing flame-retardant textiles lies in evaluating the fabric’s combustion behavior when exposed to a flame source, including key indicators such as flame spread rate, after-flame time, smoldering time, degree of damage, and smoke emission. Currently, mainstream testing methods are primarily divided into five categories, each tailored to different application scenarios with distinct testing principles and focuses.


(1) Vertical Burning Test

The vertical burning test is the most commonly used and fundamental flame-retardant testing method, suitable for most apparel textiles, protective clothing, bedding, and similar products. Its core principle is to simulate the combustion characteristics of fabric in a vertically suspended state. The testing principle involves clamping the test specimen vertically in place and applying a standard ignition source (typically a Bunsen burner with a flame height of 40 mm) to the lower edge of the specimen for a specified duration (usually 12 seconds) before removing the flame. The specimen’s after-flame time, smoldering time, and the length of damage after combustion are then recorded to assess the fabric’s flame-retardant performance.

The advantages of this method include its simplicity and broad applicability. It provides an intuitive reflection of the fabric’s flame-retardant performance under actual wearing or hanging conditions, making it the preferred method for factory-exit inspections and routine laboratory testing. Relevant standards include GB/T 5455-2014, ISO 15025, and ASTM D6413, among others; specifications regarding flame height, ignition duration, and pass criteria vary slightly across different standards.


(2) Horizontal Burning Test

The horizontal burning test is primarily suitable for lightweight textiles, decorative fabrics (such as curtains and tablecloths), and plastic-coated fabrics, simulating the burning scenario when the fabric is placed horizontally. The test principle involves placing the specimen horizontally on a specific stand, igniting it from one end with a flame source, observing the spread of the flame, and measuring the flame spread rate and the length of damage. Some standards also require recording whether molten droplets are produced during combustion.

Compared to the vertical burning method, the horizontal burning method places greater emphasis on evaluating a fabric’s flame spread capability when laid flat, making it particularly suitable for textiles that are typically placed horizontally during daily use. Common standards include GB/T 2408-2021, ASTM D635, and ISO 6941. Among these, GB/T 2408-2021 accommodates both vertical and horizontal combustion modes, meeting the testing requirements for a wide range of fabrics.


(3) 45-Degree Combustion Method

The 45-degree combustion method is primarily designed for hanging textiles, such as curtains, drapes, and stage curtains. It simulates the combustion characteristics of these fabrics when hung at an angle. The testing principle involves securing the test specimen at a 45-degree angle to the horizontal plane, igniting it from the bottom, measuring the burn time and extent of damage, and evaluating the flame spread rate along the inclined surface of the fabric.

This method closely mirrors the actual usage scenarios of hanging textiles, accurately reflecting the diffusion patterns of flames on inclined surfaces and avoiding result discrepancies caused by mismatched testing angles. Common standards include the U.S. NFPA 701 (divided into the stricter Class 1 and the general Class 2) and China’s GB/T 5456-2015. Among these, NFPA 701 serves as the core reference standard for flame-retardant testing of hanging textiles worldwide and is widely used in the inspection of export products.


(4) Limiting Oxygen Index (LOI) Method

The Limiting Oxygen Index (LOI) method is a quantitative testing method suitable for the precise evaluation of textile flame-retardant performance, particularly for quality control during the R&D phase and for high-end products. The testing principle involves placing the sample in an environment of a nitrogen-oxygen mixture and gradually adjusting the oxygen concentration until the minimum oxygen concentration required for the sample to sustain combustion (i.e., the Limiting Oxygen Index, LOI) is determined. A higher value indicates stronger flame-retardant performance of the fabric.

Generally, an LOI ≥ 28% is classified as flame-retardant fabric, while an LOI ≤ 20% indicates flammable fabric. The advantage of this method lies in its precise and quantifiable test results, which provide scientific data support for product development and standard formulation. Relevant standards include the international ISO 4589-2, China’s GB/T 5454-1997, and the U.S. ASTM D2863, among others. This method serves as a crucial testing tool for textile enterprises to enhance product quality.


(5) Supplementary Testing for Special Applications

In addition to the four basic methods described above, flame-retardant textiles intended for special applications must undergo specific testing:

1. Smoke Density Testing: Simulates the smoke emission from burning fabrics in enclosed spaces (such as subways and airplanes). Smoke density (Ds value) is measured using the light attenuation method to prevent asphyxiation caused by smoke during a fire. Common standards include GB/T 8627-2007 and ISO 5659-2;

2. Thermal Radiation Test: Designed for industrial protective clothing and fabrics used in high-temperature environments, this test simulates high-temperature radiation scenarios to evaluate the fabric’s thermal protection performance (TPP value). Relevant standards include GB 8965.1-2023 and ISO 13506;

3. Wash fastness testing: Evaluates the durability of flame-retardant properties in fabrics after repeated washing. Typically, fabrics are processed according to the washing procedures specified in GB/T 8629-2017, followed by basic flame-retardant testing to ensure the fabric remains compliant even after long-term use;

4. Smoke toxicity testing: For interior fabrics used in buildings and vehicles, this test measures the release of toxic gases during combustion to prevent secondary harm. Common standards include GB/T 20284-2006 and BS 6853.


II. Standards for Flame-Retardant Textiles


(1) GB Series

GB/T 17591-2025, implemented in 2025, is the latest core standard. It replaces the 2006 edition and further refines testing criteria and classification requirements.

1. GB/T 17591-2025 “Flame-Retardant Fabrics”: A core recommended standard covering flame-retardant fabrics for apparel, decoration, and industrial use. It introduces eight new terms, including burn length, smoke density, and thermal protection performance values. It adjusts test items and performance requirements for different applications—such as interior decoration, vehicle interiors, and flame-retardant protective clothing—including the addition of Class B3 requirements for interior decoration fabrics and smoke density grading for automotive interior fabrics.

2. GB/T 5455-2014 “Textiles—Flame Resistance—Determination of Vertical Burn Length, Smoldering Time, and Afterglow Time”: A recommended standard corresponding to the vertical burning method, applicable to routine flame-retardant testing of various textiles. It specifies sample preparation, testing procedures, and acceptance criteria, and is a commonly used standard for factory-exit testing;

3. GB 8965.1-2023 “Protective Clothing—Flame-Retardant Protection—Part 1: Flame-Retardant Clothing”: A mandatory standard for industrial flame-retardant protective clothing. It specifies test items such as vertical burning and thermal radiation, introduces new Class B2 and B3 requirements, and adjusts metrics such as burn length and after-flame time. It applies to protective workwear used in open-flame and high-temperature environments, such as firefighter uniforms and welding workwear;

4. GB 31701-2015 “Technical Specifications for the Safety of Textile Products for Infants and Children”: A mandatory standard for infant and children’s clothing. It requires flame-retardant performance to meet Class B standards (burn length ≤ 200 mm, after-flame time ≤ 5 s) and strictly prohibits the use of flammable fabrics to ensure children’s safety;

5. GB 8624-2012 “Classification of Fire Performance of Building Materials and Products”: Applicable to flame-retardant textiles used in construction (such as curtains and carpets), this standard classifies fire performance into four levels: A (non-combustible), B1 (difficult to ignite), B2 (combustible), and B3 (flammable), and specifies the testing requirements and acceptance criteria for each level.


(2) International and Regional Standards

1. ISO Series Standards (Internationally Recognized): Core standards include ISO 4589-2 (Limiting Oxygen Index Method), ISO 6940 (Vertical Burning), ISO 6941 (Horizontal Burning), and ISO 15025 (Vertical Burning, applicable to apparel fabrics), with relatively universal performance requirements;

2. ASTM Series Standards (U.S. Standards): Published by the American Society for Testing and Materials (ASTM), these standards are highly targeted. Commonly used standards include ASTM D6413 (Vertical Burning of Textiles), ASTM D3801 (Flame Retardancy of Children’s Sleepwear), ASTM E84 (Smoke Density of Textiles for Construction), and ASTM F1959 (Arc Flash Protection Testing). Among these, 16 CFR 1615/1616 is the mandatory flame retardancy standard for children’s sleepwear, with extremely strict requirements: it must pass the vertical burning test with a burn length ≤ 17.8 cm;

3. EN Series Standards (European Union Standards): Unified European standards applicable to products sold in the EU market. Key standards include EN 13501-1 (classification of combustion performance of construction products, rated from Class A to Class F based on a combined assessment of smoke generation and melting droplets), EN ISO 11925-2 (small flame test), and EN 13773 (curtain fabrics). These standards impose more detailed requirements regarding smoke density and toxic gas emissions, which companies exporting to the EU must strictly adhere to;

4. Standards for Other Regions: The UK BS series (BS 5852 for flame-retardant testing of furniture fabrics, BS EN 11611 for welding protective clothing) and the Japanese JIS series (JIS L 1091 for flame-retardant testing of textiles). Select the appropriate standards based on the requirements of the target market.


III. Applicable Scenarios and Precautions


(1) Selection of Applicable Scenarios

1. Worn textiles (clothing, sleepwear): The vertical burning test (GB/T 5455, ASTM D6413) should be prioritized. Children’s clothing must additionally comply with mandatory standards such as GB 31701 and 16 CFR 1615/1616;

2. Hanging decorative fabrics (curtains, drapes): Prioritize the 45-degree burn test (NFPA 701, GB/T 5456). Fabrics for architectural use must also meet the classification requirements of GB 8624 and EN 13501-1;

3. Industrial protective clothing: Select the vertical burn test combined with thermal radiation testing (GB 8965.1, ASTM F1959) to ensure protective performance in high-temperature and open-flame environments;

4. Vehicle interiors (automobiles, aircraft, trains): Combine the vertical burning test, smoke density test, and smoke toxicity test to comply with standards such as GB/T 17591-2025 and EN 45545-2; for aircraft and train interior fabrics, additional smoke density rating assessments are required;

5. Product R&D/High-End Customization: Prioritize the limiting oxygen index method (ISO 4589-2, GB/T 5454) to precisely quantify flame-retardant performance and optimize product formulations.


(2) Key Testing Considerations

1. Sample Preparation: Samples must be representative, drawn from different batches and locations, and meet standard dimensional requirements; They must also undergo standard pre-treatment (e.g., conditioning) to ensure the samples are in a stable state;

2. Environmental Control: Test environment temperature and humidity must comply with standard specifications;

3. Equipment Calibration: Testing instruments (e.g., combustion testers, oxygen index analyzers) must be calibrated regularly to ensure the accuracy of parameters such as flame height, oxygen concentration, and temperature measurements;


IV. The Importance of Flame Retardant Testing Instruments


Professional flame retardant testing instruments must be compatible with various testing methods and standards. They can accurately measure key indicators such as after-flame time, smoldering time, limiting oxygen index, and smoke density. Characterized by ease of operation, data accuracy, and high stability, these instruments not only meet the needs of enterprises for factory-exit inspections and R&D testing but also provide reliable testing equipment support for third-party testing institutions.

Email: hello@utstesters.com

Direct: + 86 152 6060 5085

Tel: +86-596-7686689

Web: www.utstesters.com
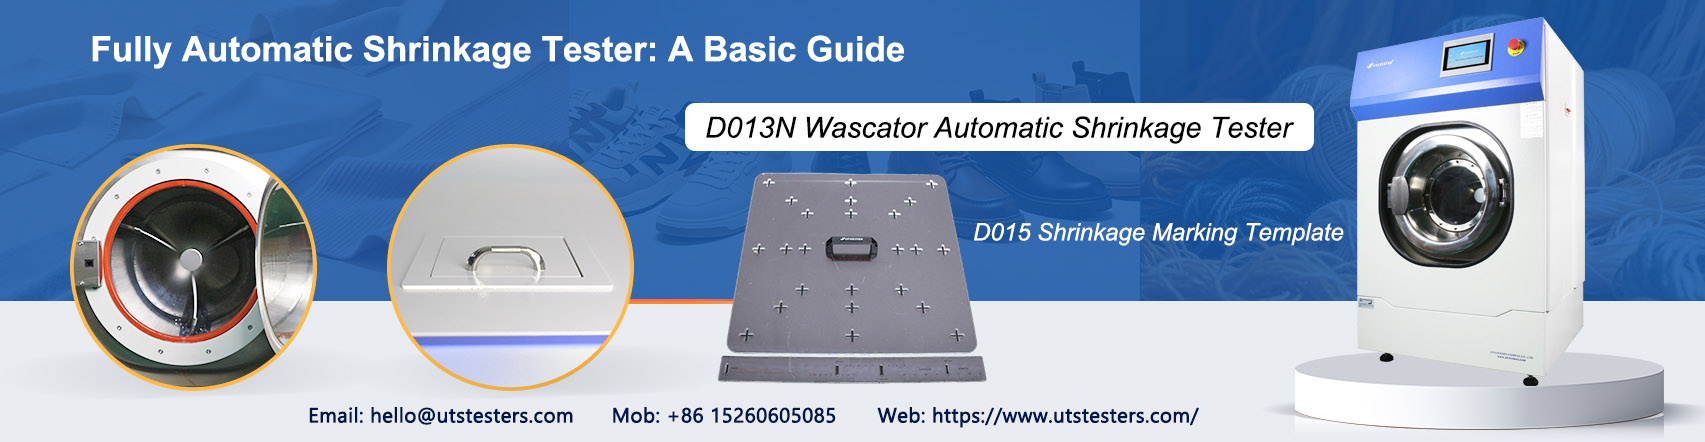


Fully Automatic Shrinkage Tester A Basic Guide

In textile production and quality control, shrinkage is a key metric that cannot be ignored. When consumers purchase a shirt or bedding, their most immediate experience often comes from the first wash—whether the size remains stable, the fit holds up, and the texture feels as good as new. The answers to these questions depend largely on whether the fabric underwent rigorous shrinkage testing during the production phase.

In this quality control process, the fully automatic shrinkage tester plays a crucial role.


I. What Is Shrinkage? Why Is It So Important?


Simply put, shrinkage rate is the percentage change in a fabric’s dimensions after washing, drying, or steam treatment. When fibers absorb water, they swell, increasing the diameter of the yarns; this causes the warp and weft yarns to pull on each other and contract. After drying, friction between the fibers prevents the fabric from fully returning to its original state, resulting in a reduction in length or width.


Shrinkage varies significantly among different fabric materials. Synthetic fibers and blended fabrics typically exhibit the lowest shrinkage rates, followed by wool and linen fabrics, with cotton fabrics falling in the middle. In contrast, regenerated fibers such as viscose and rayon tend to have relatively higher shrinkage rates. For apparel brands, improper control of shrinkage in finished garments can, at best, compromise the wearing experience and, at worst, lead to mass returns and a crisis of brand trust. Therefore, conducting standardized shrinkage rate testing before fabrics leave the factory is an essential step in ensuring product quality.


II. What Is a Fully Automatic Shrinkage Tester?


A fully automatic shrinkage tester, also commonly referred to as a fabric shrinkage washing machine or fully automatic fabric shrinkage testing machine, is a specialized device used to precisely measure the rate of dimensional change in textiles after simulated home washing and drying cycles.


Compared to traditional manual testing methods, the most distinctive feature of fully automatic equipment is “end-to-end automation”—from water intake, washing, spinning, and drying to the final dimensional measurement and data calculation, the entire process requires no human intervention. This greatly eliminates errors caused by human operation while significantly improving testing efficiency.


III. Working Principle: How Does It Perform the Test?


The core workflow of a fully automatic shrinkage tester can be divided into three main stages:


Stage 1: Sample Preparation and Marking

Before testing, the fabric to be tested must be cut into standard-sized test specimens, and reference points or reference lines must be marked on the specimens. These markings serve as reference points for subsequent shrinkage measurements. Markings are typically made using a specialized permanent marker or sewing thread to ensure they do not fade or come off during the washing process.


Stage 2: Simulated Washing and Drying

In accordance with the selected test standards (such as GB/T 8629, ISO 6330, AATCC 135, etc.), the instrument automatically executes a preset washing program. The equipment precisely controls key parameters—including water temperature, washing time, drum rotation speed, and spin speed—to simulate a real-world household washing environment. Equipped with heat pump drying technology, it automatically completes the drying process upon test completion.


Stage 3: Automatic Measurement and Data Output

Once processing is complete, the system measures changes in the positions of reference points and calculates the fabric’s shrinkage rates in the warp (lengthwise) and weft (widthwise) directions. Advanced equipment can even complete measurements in just a few seconds and automatically generate test reports containing multiple data points, including shrinkage rates, seam distortion, and diagonal distortion.


IV. Why Choose Fully Automatic Equipment?


High Precision and Repeatability

Utilizing advanced sensors and image processing algorithms, measurement accuracy can reach ±0.1% or higher—far exceeding the error margins of traditional manual measurements. Automated operation eliminates human reading errors, ensuring consistency and traceability of test results every time.


Efficient and Convenient

A single device can process multiple test specimens simultaneously and complete the entire process—from washing to measurement—in a short amount of time.


Compatibility with Multiple Standards

Modern fully automatic shrinkage testers typically come with built-in programs compliant with various international and domestic standards, such as GB/T 8629 “Household Washing and Drying Procedures for Textile Testing,” GB/T 8630 “Determination of Dimensional Changes in Textiles After Washing and Drying,” ISO 6330, ISO 5077, FZ/T 70009, and others. They also support user-defined programs to meet the testing needs of different markets and fabrics of various materials.


Intelligent and Digital

Equipped with a color touchscreen interface and supporting both Chinese and English menus, operation is intuitive and straightforward. Data can be automatically stored and exported.


V. Major Application Areas


Textile Manufacturing and Fabric Companies

Used for incoming raw material inspections, process monitoring after dyeing and printing, and final product inspections before shipment to ensure that fabric shrinkage rates meet customer requirements (e.g., within ±3%). Based on test data, companies can also optimize their pre-shrinking processes and finishing formulas.


Apparel Brands and Manufacturers

During the apparel design phase, shrinkage rate testing is used to optimize cutting dimensions and sewing processes, allowing for a reasonable amount of shrinkage. During the finished garment quality inspection phase, it verifies the product’s wash stability, reducing after-sales risks caused by dimensional changes.


Quality Inspection Agencies and Third-Party Laboratories

These organizations provide authoritative test reports for domestic and international trade, ensuring that exported textiles comply with the regulatory requirements of target markets. The high efficiency of automated equipment also helps significantly shorten testing cycles and improve service response times.


Research and Education

Universities and research institutions use this equipment to conduct research on the shrinkage properties of new fiber materials and eco-friendly fabrics, providing data support for the revision of industry standards and the development of new materials.


Email: hello@utstesters.com

Direct: + 86 152 6060 5085

Tel: +86-596-7686689

Web: www.utstesters.com
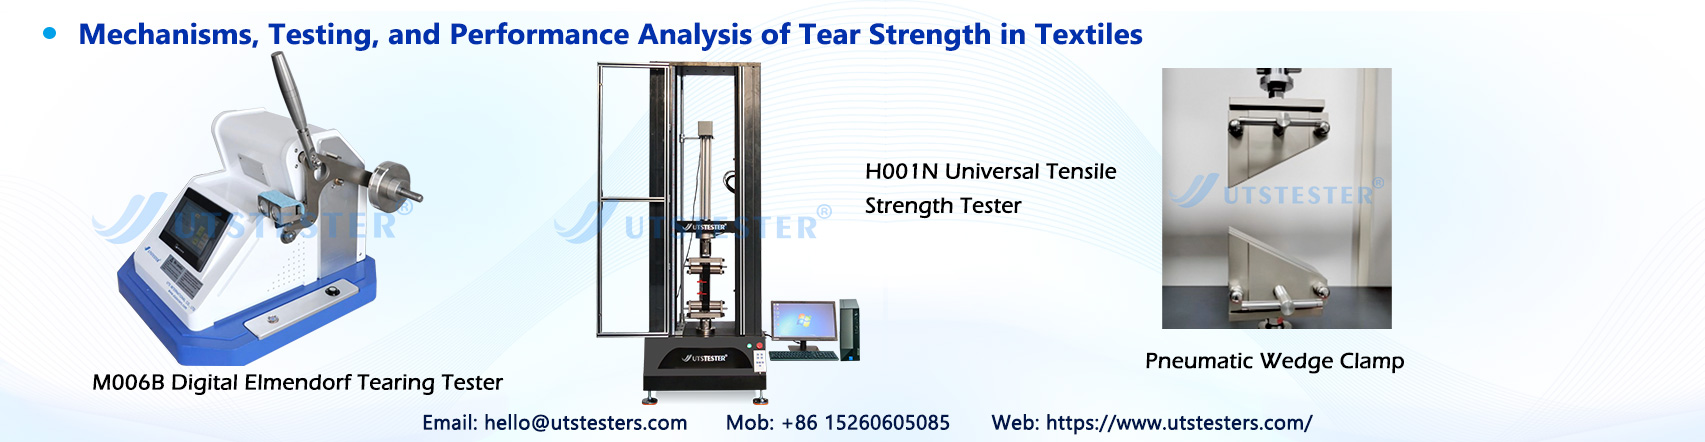

Mechanisms, Testing, and Performance Analysis of Tear Strength in Textiles

Introduction

Tearing is one of the most common forms of failure in textiles during actual use. Whether a jacket cuff gets caught on a tree branch, the knee of work pants is struck by a sharp object, or tent fabric is subjected to strong winds—these scenarios can all cause the fabric to tear rapidly along the yarn direction, starting from a localized notch.

Tear strength, as a core indicator for evaluating fabric durability and safety, directly impacts product lifespan and consumer safety. This article provides systematic technical guidance for textile testing laboratories by examining four key dimensions: failure mechanisms, testing methods, influencing factors, and instrument applications.


I. Physical Mechanisms of Tear Failure

1.1 The Nature of Tearing: Sequential Yarn Breakage

Unlike tensile failure, where an entire group of yarns bears the load simultaneously, tear failure exhibits significant stress concentration characteristics. When a notch exists at the fabric edge (e.g., a snag or cut), external force causes the yarns at the tip of the notch to first bear a load far exceeding the average. Once the first yarn breaks, the stress immediately transfers to the next yarn, creating a “domino-effect” chain of failures that ultimately results in rapid crack propagation.

During the tearing process, a characteristic stress triangle (Tearing Triangle) forms within the fabric:

- Vertex: The tip of the notch, where the single yarn currently breaking is located

- Base: The yarn system perpendicular to the tearing direction, which bears the primary load

- Hypotenuse: Adjacent yarns that are gradually drawn into the stress state


1.2 Factors Determining Tear Strength

Based on a mechanical analysis of fabric structure, tear strength primarily depends on the following factors:

1. Yarn tensile strength: Tear strength is directly proportional to the tensile strength of the yarn

2. Yarn elongation: The greater the elongation at break, the larger the area of the stress triangle, and the greater the number of yarns under stress, resulting in higher tear strength

3. Yarn coefficient of friction: Friction resistance between yarns affects stress transfer efficiency and the shape of the stress triangle

4. Fabric density and weave structure: Excessively high density may prevent yarns from sliding, thereby reducing tear strength


II. Testing Methodology and Interpretation of Standards

The most commonly used methods for testing fabric tear strength include the pendulum method (Elmendorf method), the tongue method (trouser method), and the trapezoidal method.

2.1 Pendulum Method (Elmendorf Method) — Dynamic Impact Test

Standards: GB/T 3917.1-2009, ISO 13937-1:2000, ASTM D1424-25

Test Principle: Based on the law of conservation of energy, the pendulum is raised to a predetermined height to acquire potential energy. Upon release, this potential energy is converted into kinetic energy to tear the specimen. By measuring the remaining swing angle of the pendulum after tearing the specimen, the energy consumed is calculated, thereby determining the tear strength.

Specimen Specifications: 63 mm × 100 mm rectangle with a 20 mm slit cut at the center

Scope of Application:

- ✓ Woven fabrics, nonwoven fabrics, laminated fabrics, pile fabrics, airbag fabrics

- ✓ Warp-knitted fabrics tested in the warp direction

- ✗ Weft-knitted fabrics, elastic fabrics, highly anisotropic fabrics

Technical Features:

- Fast testing speed (<1 second per test), simulating sudden tearing scenarios

- Force-time curve exhibits a typical sawtooth pattern, reflecting the process of a single yarn breaking

- Requires a multi-range pendulum (typically 200 gf–6400 gf); the test force should fall within 20%–80% of the range


2.2 Trouser Method (Single-Seam Method) — Constant-Speed Tensile Test

Standards: GB/T 3917.2-2009, ISO 13937-2:2000

Test Principle: A rectangular specimen is cut along the center of the short side to form a “trouser leg” shape. The two legs are clamped in the upper and lower grips of a tensile testing machine, respectively, and stretched at a constant rate (100 mm/min) while recording the force changes during the tearing process.

Data Collection Requirements: Divide the force-displacement curve into four equal segments. Discard the initial quarter and calculate the average of all peak values from the remaining three segments as the final result.

Differences from the Pendulum Method: The mechanisms of the two methods are similar, but the pant leg method involves slow, uniform tearing, whereas the pendulum method involves rapid impact tearing. For the same fabric, results from the pendulum method are typically slightly lower than those from the pant leg method.


2.3 Tongue Method (Double-Slit Method) — Bidirectional Tear Test

Standards: GB/T 3917.4-2009, ISO 13937-4:2000

Test Principle: Two parallel slits are cut into a rectangular specimen to form a tongue-shaped specimen. The tongues are clamped separately to keep the two cut lines parallel, and tensile force is applied along the cut lines to simulate a bidirectional tearing process.

Scope of Application: Widely used for various types of fabrics, including natural fibers, chemical fibers, and blended fabrics; particularly suitable for apparel fabrics and home textile products.


2.4 Trapezoidal Method — Multi-Yarn Synergistic Stress Test

Standards: GB/T 3917.3-2025 (New Edition), ASTM D5587

Test Principle: The specimen is cut into a trapezoidal shape with a central slit on the short side. The two non-parallel sides of the trapezoid are clamped, positioning the slit between the two jaws. During tensile testing, the tear propagates across the width of the specimen, causing a group of yarns to break sequentially under stress.

Technical Features:

- Unlike the single-yarn failure mechanism of the pendulum or single-tongue methods, the trapezoidal method exhibits multi-yarn cooperative tensile behavior

- Test values are typically significantly higher than those obtained by other methods (plain-weave cotton fabric: pendulum method < single-tongue method < double-tongue method < wing method < trapezoidal method)

- Suitable for thicker or high-strength fabrics, such as denim, industrial fabrics, and coated fabrics


2.5 Wing Method — Angular Variation Test

Standards: GB/T 3917.5-2009, ISO 13937-3:2000

Test Principle: Similar to the trapezoidal method, but the specimen is wing-shaped (isosceles triangle). By changing the clamping angle, the number of yarns subjected to force is adjusted.

Important Note: Although the wing-shaped method and the trapezoidal method belong to the same type of test, the test results cannot be directly compared due to differences in the angle of force application.


III. Guidelines for Selecting Test Methods

Principles for Method Selection:

1. Routine quality control: Give priority to the pendulum method (high efficiency) or the trapezoidal method (wide applicability).

2. Apparel products: The tongue method or pant method is recommended to simulate the forces encountered during actual wear.

3. Heavyweight/coated fabrics: The trapezoidal method must be used; the pendulum method may not be able to completely tear the fabric.

4. Arbitration Testing: Follow the method specified in the product standard; typically, the pant-shaped method or trapezoidal method is selected


IV. Key Factors Affecting Tear Strength

4.1 Raw Material Factors

Fiber Type: High-strength fibers (polyester, nylon) > natural fibers (cotton, wool). For fabrics of the same specification, the tear strength of polyester is typically 30–50% higher than that of cotton.

Yarn Structure:

- Plied yarn > Single yarn (twisting increases strength)

- Filament yarn > Staple fiber yarn (higher breaking strength)

- Textured yarn > Regular filament yarn (higher elongation, larger stress triangle)


4.2 Fabric Structure Factors

Fabric Density: There is an optimal density range. If density is too low, yarns are prone to slipping; if too high, yarns cannot slide to form stress triangles, which actually reduces tear strength.

Weave Structure:

- Plain weave < Twill weave < Satin weave (the fewer the interlacing points, the greater the yarn’s ability to slide)

- Knit fabrics typically have lower tear strength than woven fabrics (the loop structure is prone to deformation)

Post-processing Techniques:

- Resin finishing: Improves dimensional stability but reduces yarn slippage, resulting in a 20–40% decrease in tear strength

- Coating finishing: The coating penetrates yarn gaps, restricting yarn movement; evaluation requires the trapezoidal method

- Softening finishing: Increases yarn lubricity, promotes stress distribution, and can enhance tear strength


V. Industry Applications

Key Application Areas

Protective clothing: Firefighting suits and chemical protection suits require warp/weft tear strength ≥100 N (GB 24539-2021)

Outdoor gear: Tent and jacket fabrics must be evaluated for both tear strength and seam performance

Industrial Textiles: Geotextiles and filtration materials are evaluated using the trapezoidal method, with a requirement of ≥250 N (GB/T 17634)

Automotive Interiors: Airbag fabrics are tested using the pendulum method, with a requirement of ≥200 N in both warp and weft directions (ISO 13937-1)


Conclusion

Textile tear strength testing is a comprehensive discipline involving materials mechanics, structural engineering, and standardization technology. From the rapid impact of the pendulum method to the multi-yarn interaction of the trapezoidal method, different testing methods reveal distinct mechanisms by which fabrics resist tearing.

If you require technical consultation regarding specific fabric types or testing methods, please contact the UTSTESTER technical team for customized solutions.


Email: hello@utstesters.com

Direct: + 86 152 6060 5085

Tel: +86-596-7686689

Web: www.utstesters.com
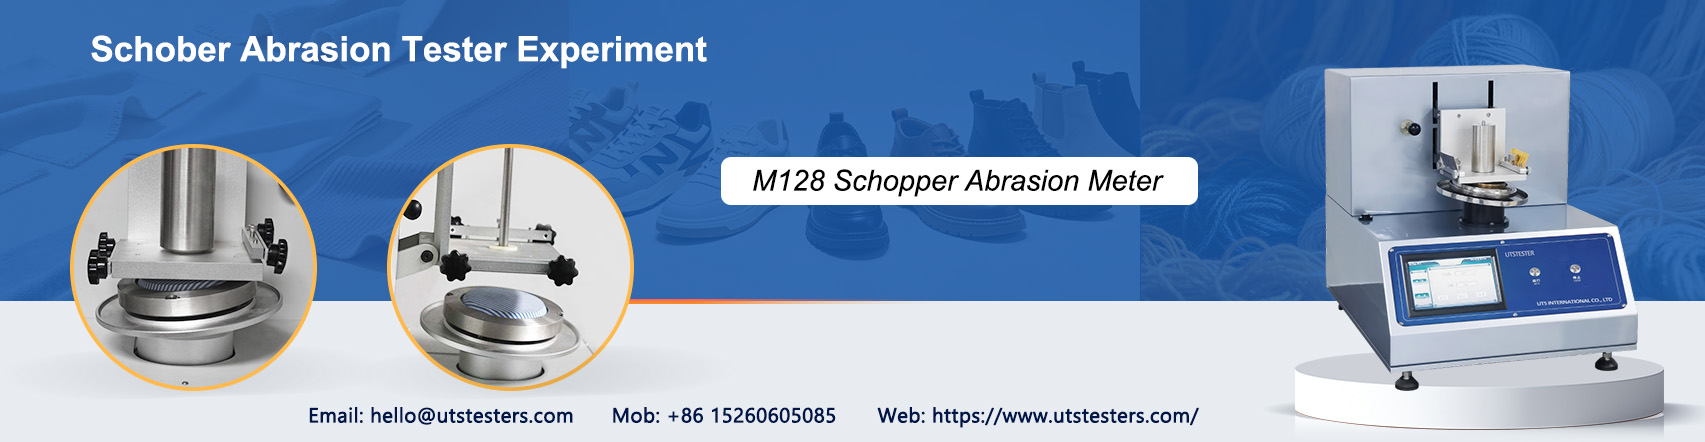


Schober Abrasion Tester Experiment

I. What Is the Schober Abrasion Tester?

The Schober abrasion tester, also known as a rotary abrasion tester, is a testing device specifically designed to evaluate the abrasion resistance of flexible materials such as textiles, automotive interior materials, and leather. This instrument simulates the wear and tear a material experiences during actual use through rotational friction, thereby assessing its durability.

Compared to the Martindale abrasion tester, the Schober abrasion tester uses larger test specimens (approximately 100 mm in diameter, with a test area of about 50 cm²) and silicon carbide sandpaper as the abrasive. This results in more concentrated friction stress and higher testing efficiency, making it particularly suitable for testing materials with stringent abrasion resistance requirements, such as automotive interior materials.


II. Operating Principle

The core operating principle of the Schopper Abrasion Tester is based on rotational tangential friction. During the test, a circular specimen is mounted on a rotating test head and secured using an obtuse-angle conical fixture. The specimen rotates at a set speed (typically 75 revolutions per minute) while maintaining linear contact with the abrasive material (silicon carbide sandpaper) located below it, generating friction in the tangential direction.

A key design feature is that after every 100 friction rotations, the instrument automatically stops and prompts the operator to reverse the rotation direction (alternating between clockwise and counterclockwise). This design ensures a more uniform wear distribution across the specimen’s surface, prevents localized excessive wear caused by unidirectional friction, and makes the test results more representative.

When mounted, the test specimen is given a certain degree of camber (typically 58 mm). This curvature creates a slight oscillating effect during rotation, ensuring that every point within the test area of approximately 50 cm² is subjected to uniform, periodic friction.


III. Applicable Standards and Fields of Application

The test method of the Schopper Abrasion Tester has been adopted by numerous international and industry standards, primarily including:

Core Standard: DIN 53863 Part 2, “Testing the Abrasion Resistance of Textile Surfaces (Rotary Abrasion Test),” serves as the foundational standard for this method. Additionally, GME Standard 60345, GMW Standard 3283, and the Volkswagen/Audi PV 3908 standard also widely adopt this testing method.

Main Application Areas:

- Automotive interior materials: Seat fabrics, headliner fabrics, door panel coverings, etc. These materials must withstand prolonged friction and wear, making the Schober Abrasion Tester a core piece of equipment for quality control at automotive OEMs.

- Apparel fabrics: Particularly workwear and outdoor clothing that require high abrasion resistance.

- Footwear materials and leather: Evaluation of the abrasion resistance of sole materials and leather goods.

- Industrial textiles: Durability testing of conveyor belts, filter materials, and similar products.


IV. Detailed Experimental Procedure

1. Sample Preparation

First, cut a circular sample with a diameter of approximately 100 mm from the specimen to be tested. The sample must undergo standard temperature and humidity conditioning (typically acclimation for at least 4 hours in an environment with a temperature of 21±1°C and a relative humidity of 65±2%) to eliminate the interference of environmental factors on the test results.

2. Sample Installation

Use the dedicated fixture provided with the instrument to mount the sample onto the rotating test head. During installation, note the following: Adjust the sample’s protrusion height using the camber measurement device, generally maintaining it within 58 mm. The camber setting directly affects the contact between the sample and the abrasive and is a key parameter for ensuring test consistency.

3. Installing the Abrasive

Securely attach silicon carbide sandpaper (commonly 280# or 400# grit) to the underside of the pressure plate using the friction material clamp, ensuring it lies flat. As the sandpaper is a single-use consumable, ensure it is installed flat and free of wrinkles. Replace it with a new sheet after each test to maintain consistent abrasive conditions.

4. Setting the Load Pressure

Select the appropriate load weight based on the specimen’s weight per unit area. Generally, the following principles apply: apply 1.0 N for specimen weights ≤ 100 g/m²; 2.0 N for 100–150 g/m²; 5.0 N for 150–300 g/m²; and 10.0 N for weights exceeding 300 g/m². The instrument’s standard weight set includes 50 g, 100 g, 250 g, 500 g, 1000 g, and 1500 g weights, enabling a pressure adjustment range from 0.5 N to 25 N.

5. Starting the Test

Set the total number of rotations and the number of rotations in a single direction via the touchscreen interface, select either manual or automatic mode, and then start the instrument. During the test, the instrument automatically records the number of rotations, pauses automatically every 100 rotations, and prompts the user to reverse direction.

6. Result Evaluation

After the test is complete, remove the test specimen for result evaluation. The Schober abrasion test typically employs the following evaluation methods:

- Mass Loss Method: Weigh the specimen before and after the test, then calculate the mass loss rate; this is the most objective quantitative indicator.

- Hole Formation Method: Record the number of rotations at which holes appear in the specimen to evaluate its ultimate abrasion resistance.

- Visual Inspection Method: Evaluate the specimen’s surface for fuzzing, pilling, and changes in gloss through visual inspection or instrument analysis.


V. Comparison of the Schober Method and the Martindale Method

In the field of textile abrasion testing, the Schober method and the Martindale method are the two most commonly used methods, each with its own specific applications:

The Schober method offers the advantages of concentrated friction stress and high testing efficiency; large test specimens (50 cm² test area) can reach the failure point more quickly. It uses mass loss as the primary evaluation metric, providing objective and quantifiable results; The standard system is centered on German DIN standards and automotive industry specifications, giving it an irreplaceable status in the automotive interior sector.

The Martindale method, on the other hand, is the more universally accepted “gold standard” internationally. It is suitable for the apparel and home textiles sectors, and the testing process more closely mimics the multidimensional friction conditions encountered in actual use.

The two methods are not simply interchangeable but rather specialized tools designed for different application scenarios. For automotive interior and industrial material testing, the Schober method is preferred due to its efficiency and objectivity; whereas for apparel and home textiles, the Martindale method offers advantages in terms of international applicability and realism.


VI. Conclusion

With its unique rotating tangential friction principle, high testing efficiency, and objective quantitative evaluation method, the Schober abrasion tester plays an irreplaceable role in abrasion resistance testing for automotive interiors, industrial textiles, and other fields.

For textile testing laboratories and manufacturing enterprises, gaining a deep understanding of the Schober abrasion tester’s experimental principles and operational key points, and establishing standardized testing procedures, is the foundation for ensuring product quality and meeting customer requirements.

If you have any questions about the Schober Abrasion Tester or textile abrasion testing, please feel free to contact the UTSTESTER technical team; we will provide you with professional testing solutions.


Email: hello@utstesters.com

Direct: + 86 152 6060 5085

Tel: +86-596-7686689

Web: www.utstesters.com
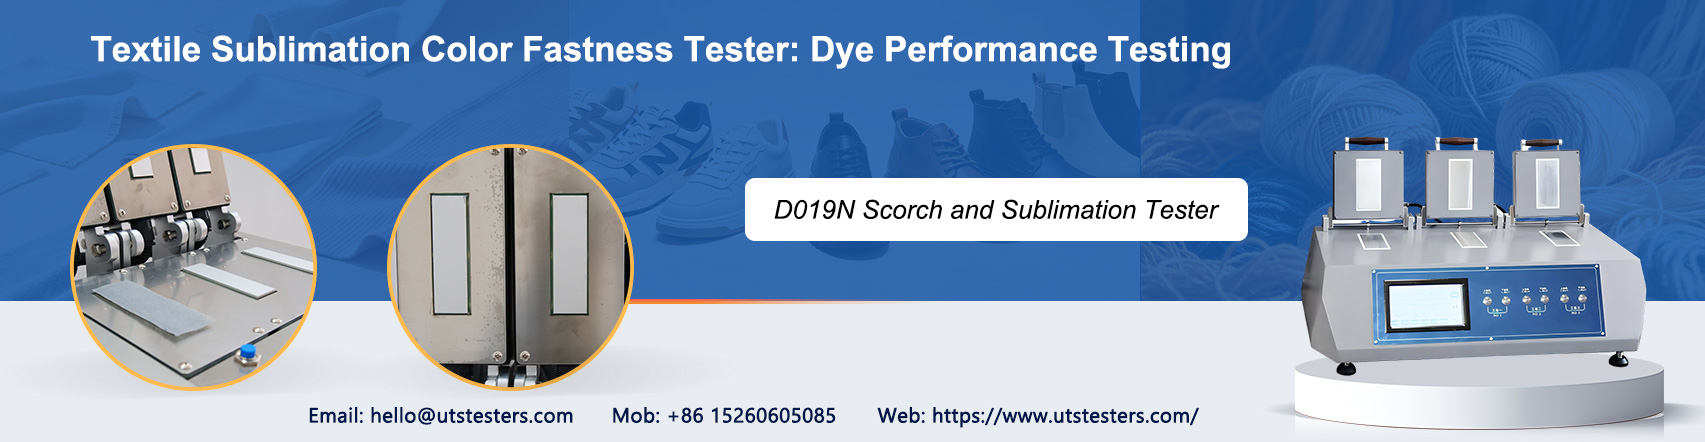


Textile Sublimation Color Fastness Tester Dye Performance Testing

I. Why Is Dye Performance Testing So Important?

In the textile production and processing chain, dye performance directly determines a product’s color stability and service life. Especially in high-temperature environments—such as during ironing, heat-press setting, and heat transfer printing—certain dyes (particularly disperse dyes) are prone to “sublimation,” that is, the direct transition from a solid to a gaseous state, leading to color migration, fading, or staining of adjacent fabrics.

This potential issue not only affects the appearance of the finished product but can also lead to consumer complaints, returns, and even damage to a brand’s reputation. Therefore, it is crucial to conduct a systematic evaluation of dye performance using a professional sublimation colorfastness tester.


II. Working Principle of the Sublimation Color Fastness Tester

The core principle of the sublimation color fastness tester is to simulate actual high-temperature processing environments. During testing, the dyed test specimen to be evaluated is layered with a standard backing fabric (typically white cotton or polyester fabric) and placed between upper and lower heating plates, where it undergoes heat and pressure treatment under specified temperature, pressure, and time conditions.

During the test, if dye molecules sublimate at high temperatures, they will migrate from the test specimen to the backing fabric, resulting in visible color transfer. After the test is complete, the dye’s sublimation colorfastness can be quantitatively assessed by comparing the color change of the test specimen itself (discoloration of the original specimen) with the degree of color transfer on the backing fabric.


III. Primary Applicable Standards

Sublimation colorfastness testing must strictly adhere to internationally and industry-recognized standard methods. Common standards include:

1. ISO 105-P01: Test method for dry heat (sublimation) colorfastness of textiles.

2. GB/T 5718: Chinese national standard corresponding to ISO 105-P01, applicable to dry heat colorfastness testing of various textile materials.

3. GB/T 6152: Test method for heat-press colorfastness of textiles, covering various test modes such as dry pressing, wet pressing, and damp pressing.

4. AATCC 133: American Association of Textile Chemists and Colorists standard for heat-press colorfastness.

5. JIS L 0850: Japanese Industrial Standard specifying the specific test conditions for sublimation colorfastness.


IV. Brief Description of the Test Procedure

In practice, sublimation colorfastness testing typically follows these steps:

First, cut the test specimen and backing fabric to the standard dimensions, ensuring the specimen is flat, free of wrinkles, and free of impurities. Next, place the backing fabric on the lower heating plate, cover it with the test specimen face up, lower the upper heating plate, and apply the standard pressure.

Next, set the target temperature (e.g., 180°C) and test duration (e.g., 30 seconds) on the instrument’s control panel, then initiate heating. When the upper and lower heating plates reach the set temperature and close, the timer starts automatically. Upon reaching the set time, the instrument emits a beep; lift the heating plates and quickly remove the test specimen and backing fabric.

Finally, allow the specimen to cool and equilibrate in a standard temperature and humidity environment, then use a gray scale to evaluate the specimen’s discoloration level and the backing fabric’s color transfer level. For more precise data, color difference values (ΔE) can be measured using a spectrophotometer.


V. Conclusion

As consumer demands for textile quality continue to rise and the global textile supply chain places increasing emphasis on sustainability and safety, dye performance testing has evolved from an “optional” to a “mandatory” requirement. A reliable and user-friendly sublimation colorfastness tester enables companies to precisely control color stability during high-temperature processes, thereby ensuring product quality.

Email: hello@utstesters.com

Direct: + 86 152 6060 5085

Tel: +86-596-7686689

Web: www.utstesters.com


The Significance of Button Strength Testers

I. Introduction

In daily life, buttons may seem insignificant, yet they are closely tied to wearer safety. Choking incidents caused by infants and toddlers accidentally swallowing loose buttons occur frequently, while loose buttons on adult clothing not only compromise the user experience but can also lead to embarrassment or even safety hazards. The durability of buttons is one of the key indicators of garment quality.

The Button Snap Pull Tester evaluates the attachment strength between buttons and fabric through scientific and quantitative methods, establishing the first line of defense for garment safety.


II. What Is a Button Strength Tester?

2.1 Equipment Definition and Classification

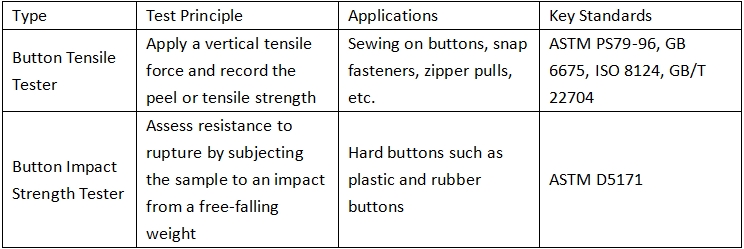
A button strength tester is a specialized testing instrument used to measure the fastening strength of garment accessories such as buttons, snaps, four-prong snaps, five-prong snaps, and denim buttons. Based on different testing principles, they are primarily divided into two major categories:

2.2 Structural Components

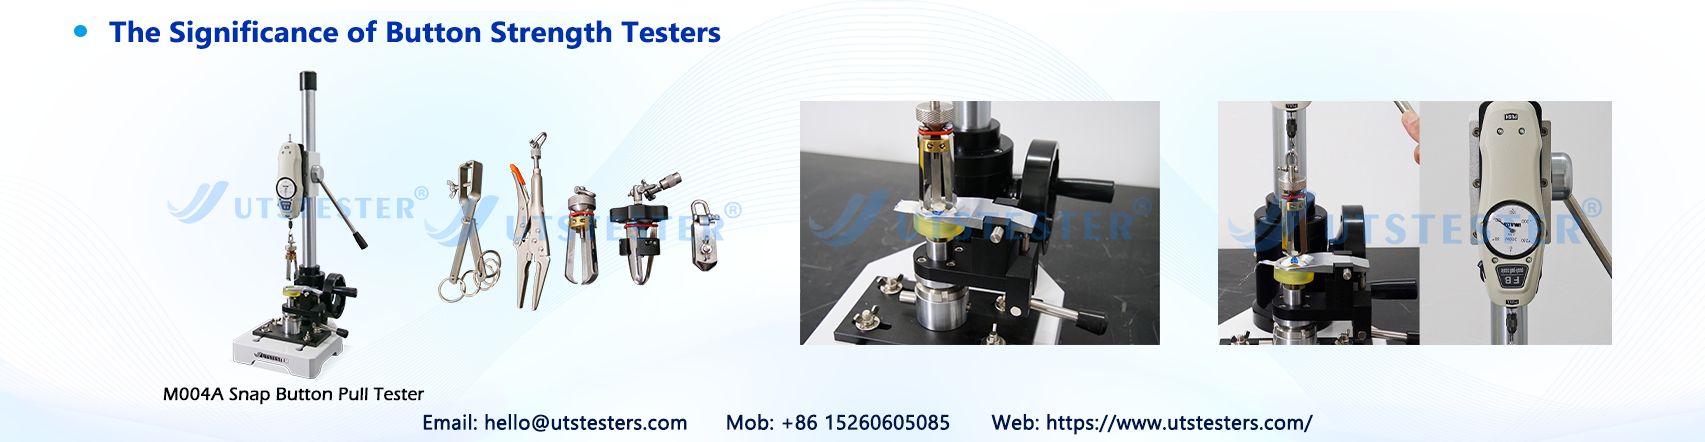
Taking the UTSTESTER M004A Snap Button Pull Tester as an example, it primarily consists of the following components:

1. Concave clawless clamp/button fixture: Used to secure the button component under test

2. Bottom fabric clamp: Securely holds the garment fabric

3. Force gauge/sensor: Displays and records force values in real time

4. Speed control wheel/drive unit: Controls the speed and intensity of the applied tensile force

5. Multi-type adapter fixtures: Includes two-jaw clamps, three-jaw clamps, male button fixtures, female button fixtures, etc., to accommodate different button types


III. Test Principles and Technical Points

3.1 Principle of Tensile Testing

Button tensile testing simulates the tensile forces a button may endure during actual wear. During testing:

1. Secure the garment sample to the bottom fabric fixture

2. Clamp the button assembly using a specialized fixture

3. Apply vertical tensile force at a specified clamping separation rate (typically 100±10 mm/min)

4. Continue applying force until the button detaches, the stitching breaks, or the fabric tears

5. Record the maximum breaking force and failure mode


3.2 Example of Evaluation Criteria

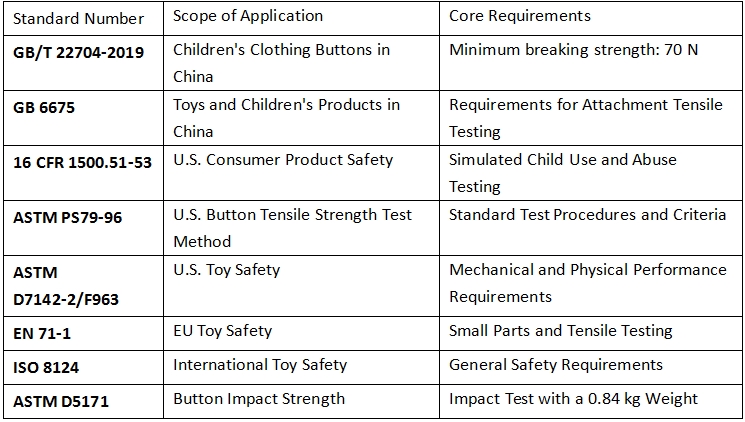
Taking children’s clothing as an example, according to GB/T 22704-2019 “Implementation Specifications for the Design and Production of Children’s Clothing to Improve Mechanical Safety”:

All buttons must withstand a minimum breaking force of 70 N, and no loosening, damage, or stitching slippage may occur during the test. At least 20 buttons of each style must be tested; if even one fails, the entire batch must be retested.


IV. Significance of Application

4.1 Child Safety

Infant and children’s clothing is a top priority for button strength testing. Due to children’s natural tendency to chew on and pull at their clothing, as well as the risk of accidental ingestion of foreign objects, regulations in various countries impose strict requirements on the fastening security of children’s clothing accessories:

1. China: GB 6675 “Safety of Toys,” GB/T 22704 “Buttons for Children’s Clothing”

2. United States: 16 CFR 1500.51-53 (CPSC Mandatory Requirements), ASTM F963

3. European Union: EN 71-1 “Safety of Toys—Mechanical and Physical Properties,” REACH Regulation

4. International: ISO 8124 “Safety of Toys”

These regulations generally require that buttons on children’s clothing must withstand a certain level of tensile force without detaching. The use of a button strength tester helps improve the safety and quality of buttons.

4.2 Quality Control

Button fastening strength depends not only on the quality of the button itself but is also closely related to factors such as sewing techniques, fabric properties, and stitch density. A button strength tester can be used to:

1. Incoming inspection: Verify differences in mechanical properties among different batches of buttons

2. Process Optimization: Compare the impact of different sewing parameters (stitch length, thread type, lockstitch) on fastening strength

3. Finished Product Sampling: Ensure mass-produced items meet customer-specified tensile strength standards


4.3 Extended Applications

By changing fixtures, the button strength tester can also inspect various garment accessories:

1. Zipper Pulls: Test the pull-off strength of zipper pulls with holes

2. Bow Ties and Bows: Evaluate the attachment strength of decorative accessories

3. Appliques and Embroidery: Verify the durability of heat-sealed or sewn-on appliqués

4. Hooks and D-Rings: Test the load-bearing capacity of metal hardware in luggage and footwear

5. Rivets and Denim Buttons: Evaluate the mechanical properties of accessories with specialized manufacturing processes


V. Interpretation of Industry Standards and Regulations

Primary Applicable Standards

VI. Conclusion

While a button strength tester may be just an ordinary piece of equipment in a textile testing laboratory, its significance far exceeds its physical size. From ensuring the safety of infants and young children to safeguarding a brand’s commercial reputation; from meeting international trade compliance requirements to driving quality improvements across the industry—the use of button strength testers embodies the modern textile industry’s unwavering commitment to “safety” and “quality.”

Email: hello@utstesters.com

Direct: + 86 152 6060 5085

Tel: +86-596-7686689

Web: www.utstesters.com


The Significance of the Wash Fastness Tester

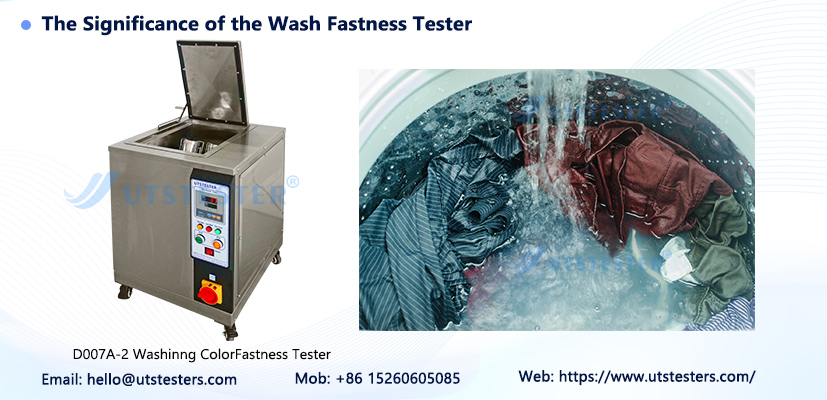
Throughout the entire textile production and trade chain, color is one of the most intuitive elements perceived by consumers. However, when a brightly colored new garment fades or bleeds after just a few washes, it not only affects the wearing experience but may also pose a risk to consumer health. By scientifically simulating washing conditions, the color fastness to washing tester provides an accurate and quantifiable basis for evaluating the color durability of textiles.


I. What Is Wash Fastness? Why Is It So Important?

Color fastness refers to the ability of dyed or printed textiles to resist various external factors (such as washing, friction, perspiration, and light exposure) during processing or use. Among these, wash fastness specifically measures a textile’s ability to maintain color stability during the washing process, encompassing two aspects:

- Color Change: The degree of color change in the sample itself after washing

- Staining: The extent to which the sample’s color migrates to adjacent fabrics (such as multi-fiber interlinings)

The quality of colorfastness directly affects a product’s durability, aesthetic appeal, and the consumer’s user experience. Products that fail colorfastness tests may experience issues such as fading or staining during wear or washing. These problems not only compromise appearance but may also release harmful dye molecules or heavy metal ions, which can be absorbed through the skin and pose a potential threat to human health.


II. Operating Principle of the Color Fastness to Washing Tester

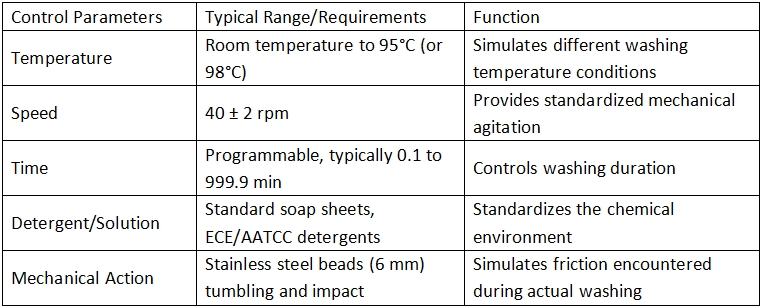
The core operating principle of the color fastness to washing tester is to simulate standardized domestic or commercial washing processes. During testing, the textile sample is bonded to a specified standard backing fabric, placed in a standard washing solution, and subjected to mechanical agitation for a specified duration at a specified temperature. After rinsing and drying, the degree of color change and color transfer is evaluated using a gray scale.

Key Parameters:


Modern high-end testing instruments are typically equipped with programmable control systems, high-precision PID temperature control modules, solid-state relay heating systems, and interchangeable test vessels (500 mL or 1200 mL options), ensuring that temperature fluctuations are kept within ±1°C and effectively eliminating temperature “overshoot.”


III. The Significance of Wash Fastness Testers

1. Ensuring Consumer Safety and Health

Textiles that fail colorfastness tests may release dye molecules when exposed to rain, sweat, or washing, which can be absorbed by the skin and may even contain harmful substances such as heavy metal ions. Through standardized testing, wash fastness testers ensure products comply with domestic and international safety requirements, including China’s GB standards, the EU REACH Regulation, and OEKO-TEX® certification, thereby safeguarding consumer health at the source.


2. Enhancing Product Competitiveness

In the highly competitive textile market, high colorfastness signifies greater durability and reliability. Through rigorous wash fastness testing, companies can:

- Select high-quality dyes and auxiliaries to optimize dyeing processes

- Reduce customer complaints and returns caused by fading or color bleeding

- Build brand reputation for quality and earn long-term consumer trust


3. Meeting International Regulations and Trade Access Requirements

Different countries and regions have strict regulatory requirements for textile colorfastness:

- China: GB/T 3921 “Textiles—Colorfastness Tests—Colorfastness to Soap Washing”

- International: ISO 105-C06 series

- North America: AATCC 61 (Soap Wash Fastness), AATCC 190

- Japan: JIS L0844

- UK/EU: BS EN ISO 105-C06


4. Optimize Production Processes and Cost Control

During the product development phase, colorfastness testing is used to evaluate the stability of dyes and processes. Using test data, technicians can:

- Assess the effectiveness of fixatives and optimize finishing processes

- Identify issues related to insufficient dye-fiber bonding

- Avoid significant financial losses resulting from discovering colorfastness non-compliance only after mass production


5. Coverage of a Wide Range of Textile Categories

The application scope of colorfastness to washing testers is extremely broad, suitable for:

- Natural fibers: cotton, linen, wool, silk, etc.

- Synthetic fibers: polyester, nylon, acrylic, spandex, etc.

- Blended and interwoven fabrics: various blended fabrics

- Finished product categories: apparel fabrics (shirts, denim, sportswear), home textiles (bed linens, curtains, towels), industrial textiles

- Other materials: leather, plastics, etc.


IV. Modern Wash Fastness Testers

With the continuous advancement of textile testing technology, modern wash fastness testers have exhibited the following trends:

Intelligence and Automation

- 7-inch color touchscreen: Features integrated Chinese and English interfaces, supporting one-click selection of test standards, parameter customization, temperature calibration, and data export

- Macro programming: Allows recording and saving of common test procedures to automate batch testing

- Intelligent Temperature Control Algorithm: Temperature fluctuations are maintained within ±1°C, ensuring testing accuracy


Dual-Mode and Modular Design

- Dual-Tank Independent Control: Allows simultaneous testing of two sets of samples under different temperatures or conditions, significantly improving testing efficiency

- Compatibility with Wet and Dry Cleaning Modes: By changing detergents and adjusting process parameters, the instrument covers dry cleaning standards such as ISO 105-D01 and AATCC 132

- Modular cup rack system: Interchangeable 500mL/1200mL test cups accommodate various sample sizes and standard requirements


Safety Protection and Durability

- Multiple safety protections: Low-water alarm, over-temperature alarm, door-open alarm, and dry-run protection

- 304/316 Stainless Steel Construction: Highly corrosion-resistant, suitable for long-term, high-frequency use

- Solid-State Relay Control: No mechanical contacts, stable temperature, silent operation, and long service life


Data Management and Traceability

- Test History Log: Stores temperature curves, test parameters, and results for easy quality traceability

- Data Export Function: Supports export via USB or network interface for convenient generation of test reports


Email: hello@utstesters.com

Direct: + 86 152 6060 5085

Tel: +86-596-7686689

Web: www.utstesters.com

Understanding the Manual Friction Tester

1. Definition of Manual Friction Tester

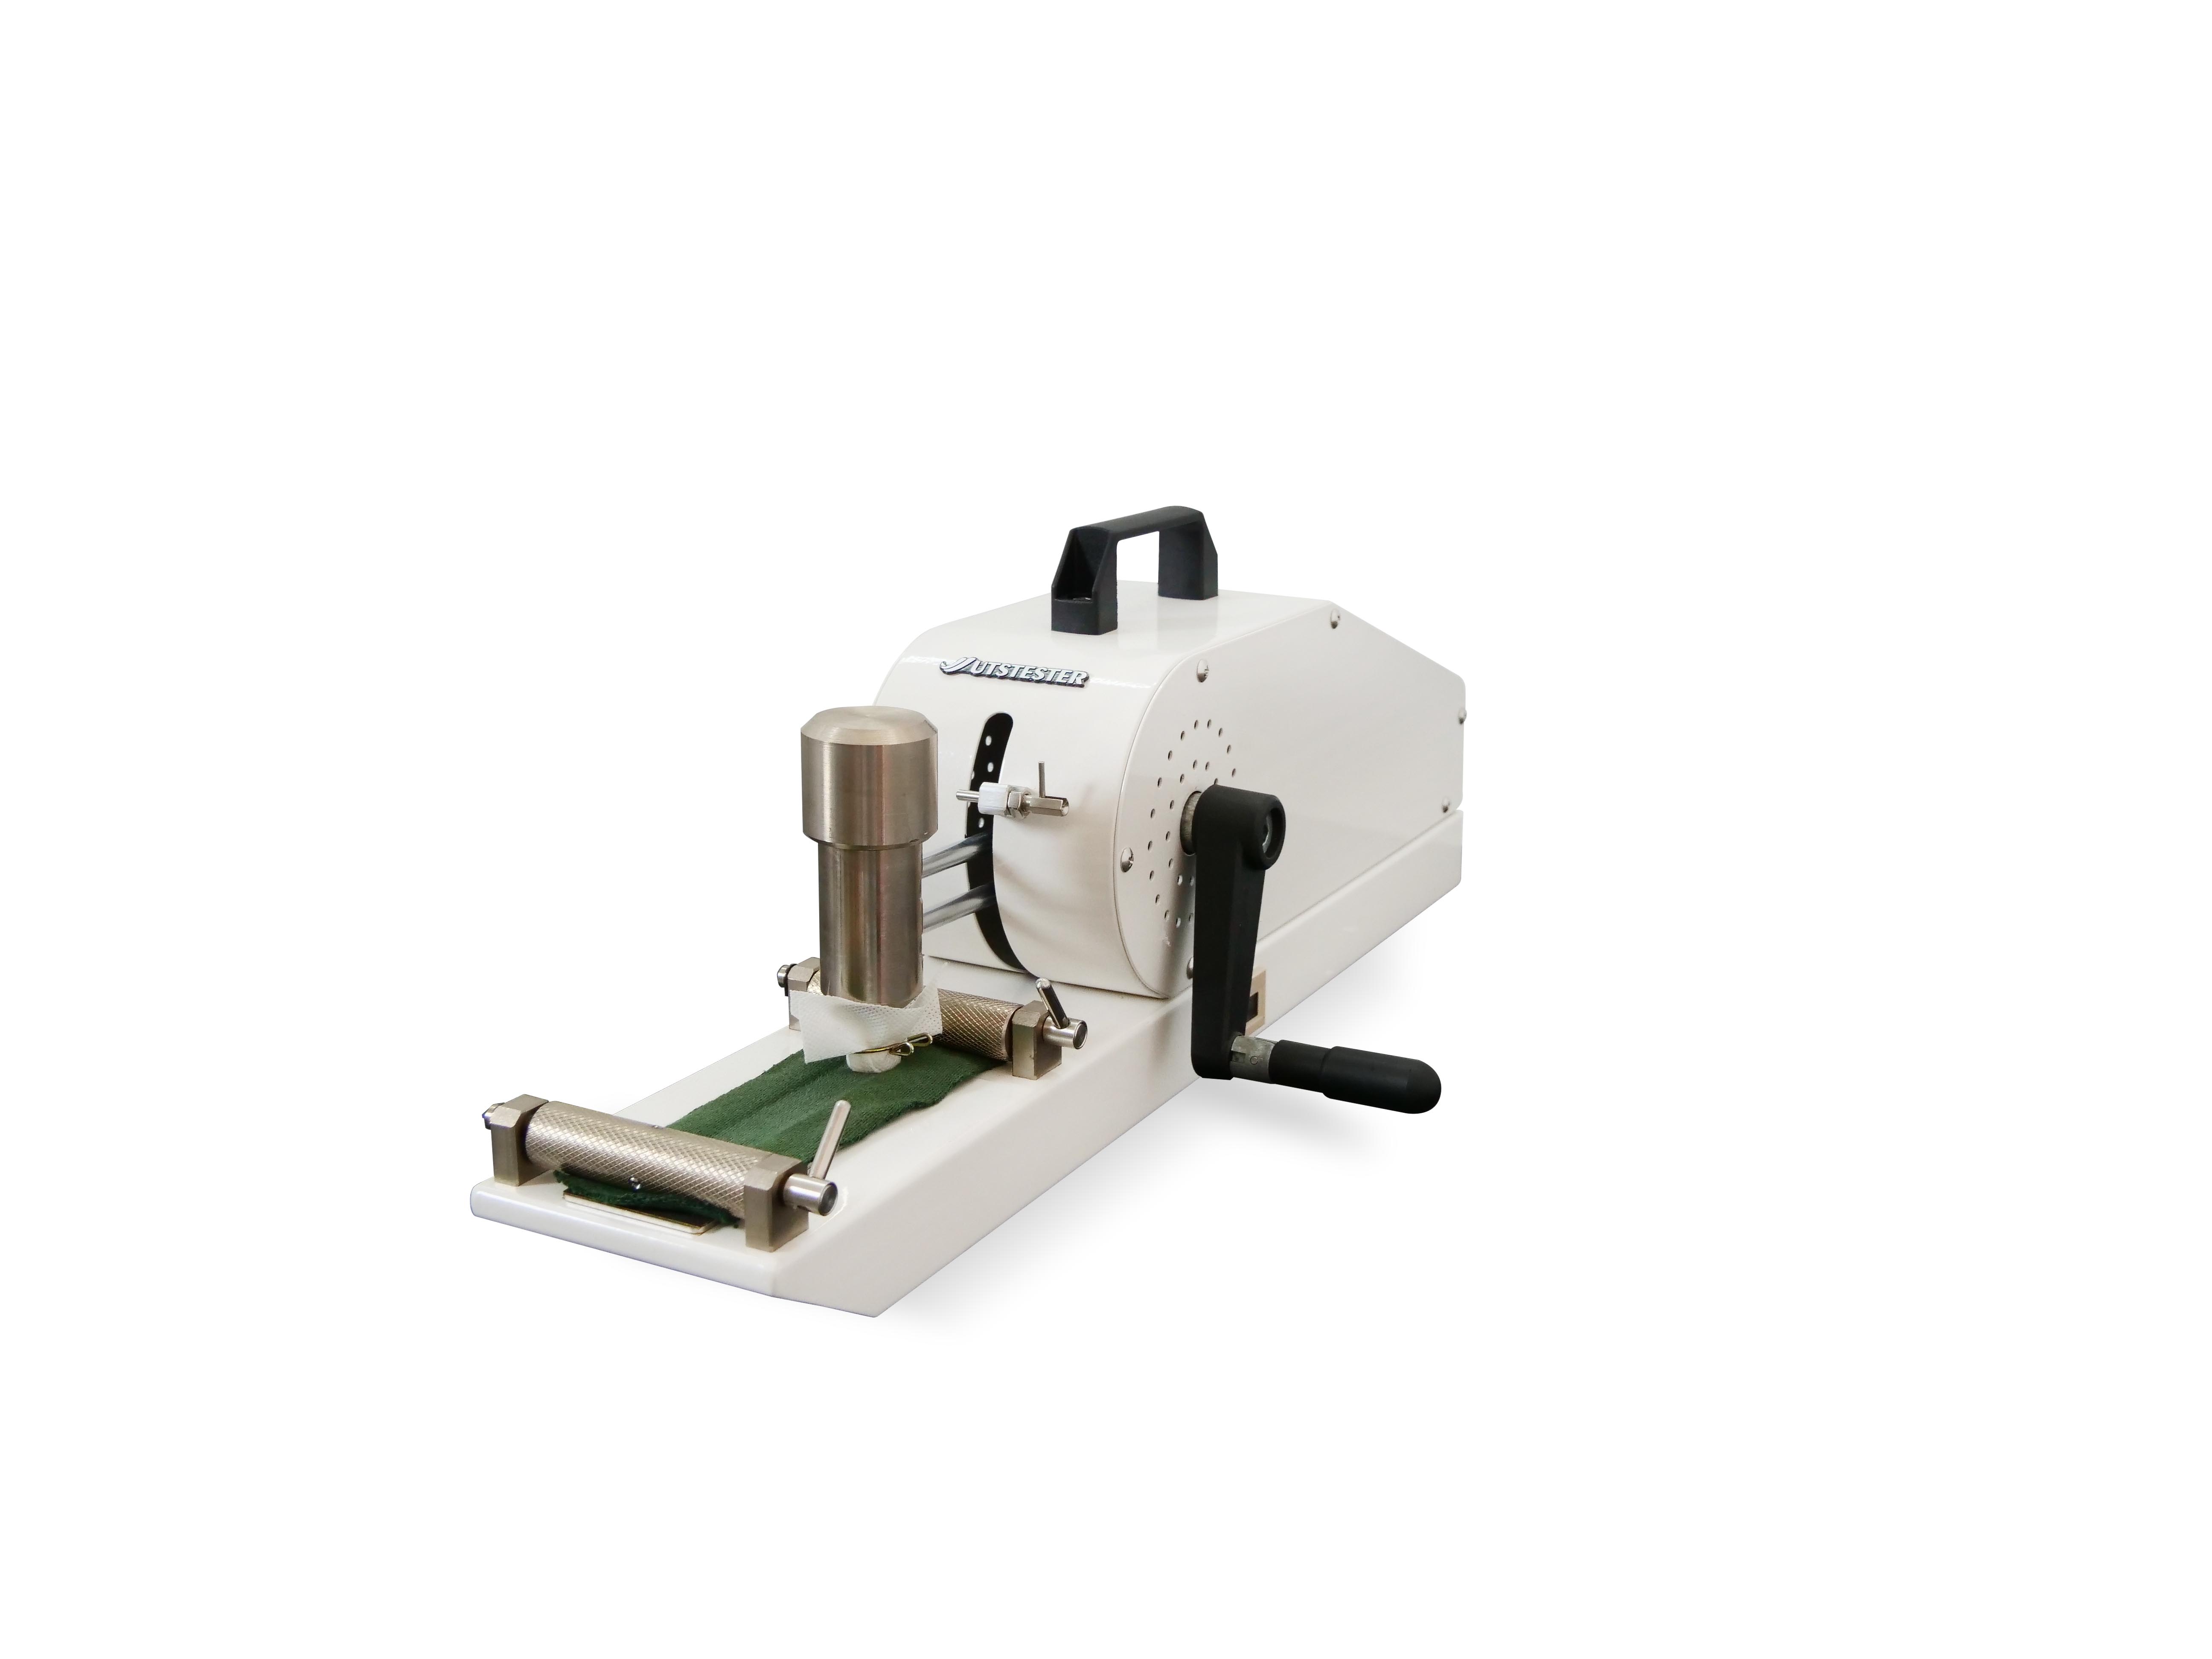
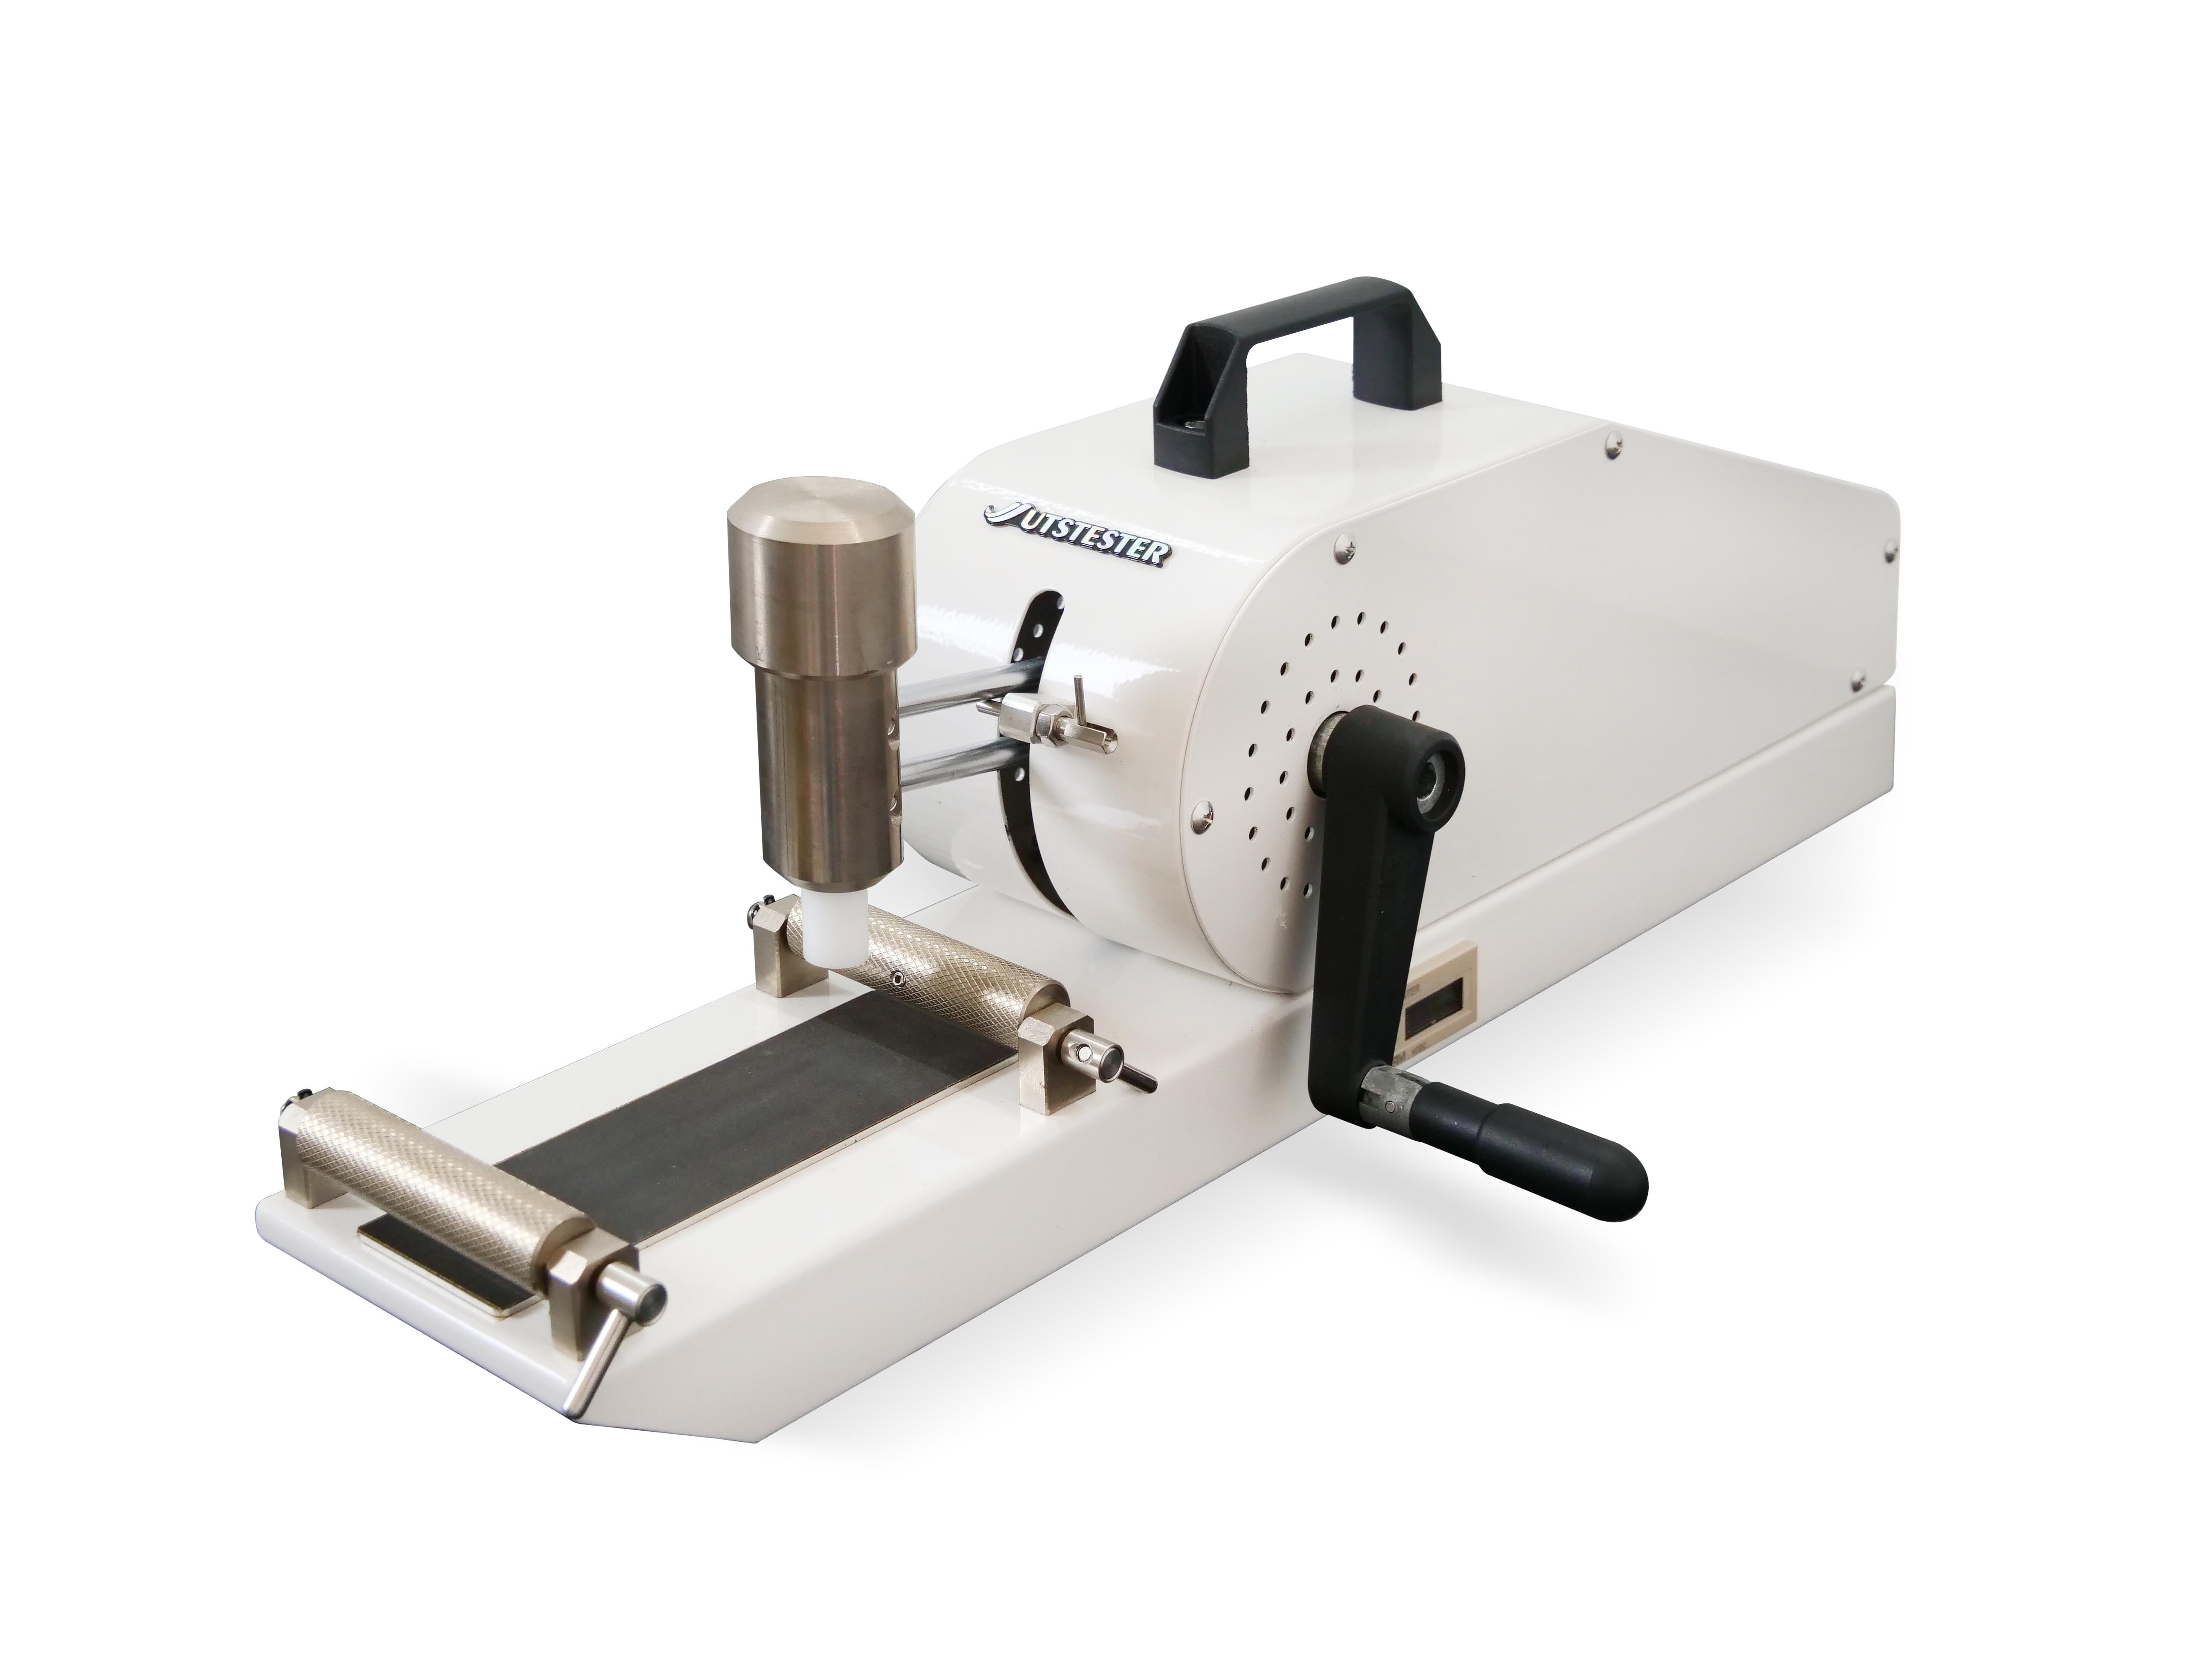
The Manual Friction Tester is a portable testing instrument that simulates friction action through manual operation and is used to evaluate the wear resistance and anti-friction performance (such as discoloration, wear, breakage, etc.) of the material surface. It is widely used in the textile, printing, leather, coating, plastic and other industries, and is a basic tool for judging the friction resistance of materials in actual use.


2. Working principle of manual friction tester

The core is "simulating actual friction scenarios": by manually controlling the friction head (installing specific friction media, such as cotton cloth, wool, sandpaper, etc.), applying a preset pressure on the sample surface, and after a certain number of reciprocating/rotating frictions, observing the changes on the sample surface (such as the degree of color transfer to the friction medium, surface wear marks), so as to quantify the friction performance of the material (such as color fastness, wear resistance level).


3. Manual friction tester structure

The manual friction tester has a simple structure and mainly includes the following components:

Base: used to place and fix the sample to ensure that the sample does not move during the test.

Friction head: install the friction medium (select according to the test requirements, such as dry cotton cloth, wet cotton cloth, sandpaper, etc.), directly contacting the sample surface.

Pressure adjustment device: control the pressure of the friction head on the sample (usually adjusted by weights or knobs, the common pressure is 200g-1000g, which must meet industry standards).

Counting device: records the number of frictions (mostly manual counting or simple mechanical counters, some models require manual recording).

Sample fixing device: such as clamps, pressure plates or Velcro, used to fix samples of different materials (such as cloth, leather, plates, etc.) to prevent displacement during friction.

Friction stroke limiter: Some models are equipped with guide rails or rulers to limit the friction range of the friction head (such as the stroke length of reciprocating friction, usually 10-100mm).


4. Manual friction tester operation steps

The operation must strictly follow the industry standards (such as GB/T 3920 for textiles, ISO 105-X12 for printed materials, etc.), the steps are as follows:

Sample preparation: Cut the sample into standard size and fix it flat on the base (avoid wrinkles or looseness).

Friction medium selection: Select the friction medium according to the test type (such as dry cotton cloth for dry friction, cotton cloth with 80%-100% water content for wet friction), and fix it on the friction head.

Parameter setting:

Adjust pressure: set pressure by weight or knob; determine the number of frictions.

Manual friction: hold the friction head and rub the sample at a constant speed in the preset direction (reciprocating or rotating) while counting.

Result evaluation:

Color fastness: use grayscale card to compare the color residue on the friction medium;

Abrasion resistance: observe the wear area and depth of the sample surface, or weigh and compare the quality difference before and after friction.


Email: hello@utstesters.com

Direct: + 86 152 6060 5085

Tel: +86-596-7686689

Web: www.utstesters.com